Author Topic: Breech loader swivel gun (A LOT of pics) drawings...  (Read 5716 times)

0 Members and 1 Guest are viewing this topic.

Offline MikeR C

  • Trade Count: (0)
  • Avid Poster
  • **
  • Posts: 178
  • Gender: Male
Breech loader swivel gun (A LOT of pics) drawings...
« on: May 29, 2008, 05:15:12 PM »
The pic below is of the breach loader this thread got me started on. It shoots firecrackers.


Let me preface the following with the fact that I am not a draftsman, have very little experience with dimensioning a drawing, nor know the rules about how to actually correctly generate a drawing. The last drafting class I took we used burnt sticks on the cave wall. I hope this method will work for distributing drawings, my CAD program will not export drawings in any kind of useful format so I broke the drawings up and took screen prints. If I have missed a dimension somewhere let me know and I will post an updated sheet. I am attaching the drawings as opposed to hosting them because of so many missing photos as the posts age.

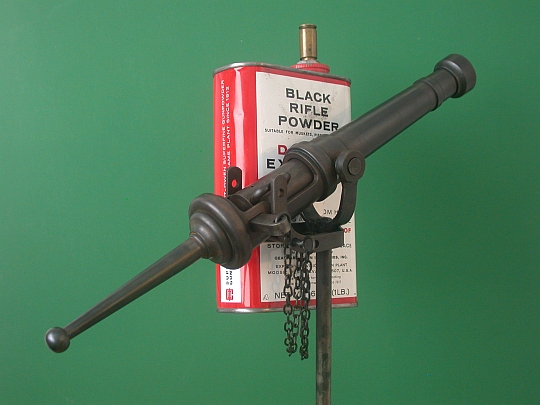
The cannon was designed to shoot 1 1/2" firecrackers although I don't doubt it would shoot other projectiles as well. The charge is one .22 case full of crushed FFFFG using a piece of 1mm fuse from Skylighter.com (Visco, Cross-Match). Some of the dimensions are a little goofy, why make something 1.894" you ask? I re drew it from "as built" as I went along. There are no really precision fits except where the barrel fits the breech, where the chamber fits into the barrel, and where the key fits behind the chamber to push it tight into the back of the barrel.

The entire cannon is made from steel, in my case the barrel, breech, and chamber is made from 1144 stresspruf and the remainder from mild steel. Flat pieces are made from hardware-store 1/8" band iron, 1/2" wide. The key for the breech block is 1/4" band iron.

The barrel was sweat soft soldered (the CORRECT use of sweat :) ) into the breech using solder paste (powdered solder mixed with flux it sweats real good). After the yoke was made, pockets were drilled into the barrel through the breech then the trunnions were fastened into the pockets withLocktite 680 bearing retainig compound. Everything else was welded. You can put it together with whatever you are comfortable with.

The tail is attached with a 1/4-20 stud flush with the inside of the breech and secured with 680 retaining compound.

If I had it to do it over there are a few things I would have done differently. I would have made the bore 9/32" instead of 5/16". I would have used 12L14 at least for the breech, boring the taper on the inside, blind, in 1144 was tough on a cheap Chinese lathe. I would have made the breech longer so the chamber could be a bit longer for a bigger charge. As it stands now the .22 shell full puts the end of the 1 1/4" firecracker right at the end of the chamber. I'm going to try for 1" firecrackers this 4th. However I shot it quite a bit over the holiday and a .22 shell full of powder made quite the bang, I'm not so sure I would lengthen it.

Watch the preponderance (balance), I was a little worried but it came out all right.(even without the chamber it is still breech heavy). There is no taper specified, I do not have a taper attachment so I just set the compound close as I could then did everything at that setting.

Each piece including barrel was very roughly wire brushed on a grinder to give it a blotchy appearance and take off the sharp machined edges. The finish in the photo is Birchwood Casey cold blue mixed  with 3 parts of distilled water, brushed on with a 1" brush till it is all black then let dry. It turns all rusty looking then I oiled it and slightly wiped it down with a paper towel, I wanted it blotchy looking, Saltwater is hell on those wrought iron swivel guns!

The chain should be pretty self explanatory. To rods of different size, in this case a .125" and a .093" are wrapped with 18 gauge black iron wire and then a Dremel tool with a thin abrasive wheel is used to split the wraps as close to the middle of the large rod as you can. The loops are linked together and closed with pliers. The result of using two different sized rods is that the links come out oblong instead of round.

I hope these drawings turn out to be a useful way of providing drawings and that I haven't forgotten too many of the details.

Thanx
MikeR C

Offline MikeR C

  • Trade Count: (0)
  • Avid Poster
  • **
  • Posts: 178
  • Gender: Male
Re: Breech loader swivel gun (A LOT of pics) drawings...
« Reply #1 on: May 29, 2008, 05:18:50 PM »
More drawings...

Offline MikeR C

  • Trade Count: (0)
  • Avid Poster
  • **
  • Posts: 178
  • Gender: Male
Re: Breech loader swivel gun (A LOT of pics) drawings...
« Reply #2 on: May 29, 2008, 05:21:30 PM »
The final drawings...

Offline seacoastartillery

  • GBO Sponsor
  • Trade Count: (1)
  • Senior Member
  • *****
  • Posts: 2853
  • Gender: Male
    • seacoastartillery.com
Re: Breech loader swivel gun (A LOT of pics) drawings...
« Reply #3 on: May 30, 2008, 06:49:25 AM »
     
Let me preface the following with the fact that I am not a draftsman, have very little experience with dimensioning a drawing, nor know the rules about how to actually correctly generate a drawing. The last drafting class I took we used burnt sticks on the cave wall. I hope this method will work for distributing drawings, my CAD program will not export drawings in any kind of useful format so I broke the drawings up and took screen prints. If I have missed a dimension somewhere let me know and I will post an updated sheet. I am attaching the drawings as opposed to hosting them because of so many missing photos as the posts age.

     Mike and I both think you did an extraordinary job on the gun AND the drawings.  The finish you used on your gun is perfect.  It is just what you would expect one to look like after some age and use.  Your drawings are extensive and very complete.  We looked at all the critical areas and we are pleased that the joining of the tube to the receiver via the trunnions is clear and the chamber and bore dias. are there.  All in all, these drawings are excellent.  One little area dimensioned on the #8 Chamber drawing and the #3 Barrel drawing is the mating of the forward Chamber extension dia. into the tube counterbore.  Both of these are dimensioned .512" Dia. which is a 'line-to-line' fit.  Although you obviously want a close fit for the critical alignment of features in this area, in our experience a line-to-line fit almost always results in an interference.  The parts rarely fit together and we're sure this is not your intent.  Two small chamfers on the leading edges would help too.  We also miss a few dimensions on every large drawing we do.  We usually correct our initial errors by letting the work 'cool off' for a few days and then go back and give it another review and then another after a few weeks.  It ain't easy!  If drafting was so simple, everyone would be doing it.

     We love your B.L. Swivel Gun and have already filed the drawings in the "Build Upon Retirement Folder"!

Regards,

Mike and Tracy
Smokin' my pipe on the mountings, sniffin' the mornin'-cool,
I walks in my old brown gaiters along o' my old brown mule,
With seventy gunners be'ind me, an' never a beggar forgets
It's only the pick of the Army that handles the dear little pets - 'Tss! 'Tss!

From the poem  Screw-Guns  by Rudyard Kipling

Offline kappullen

  • Trade Count: (2)
  • Avid Poster
  • **
  • Posts: 175
Re: Breech loader swivel gun (A LOT of pics) drawings...
« Reply #4 on: May 30, 2008, 07:59:40 AM »
MikeR,
That is a beautiful job!
Your attention to detail is great.
It appears much larger than the actual size.
The drawings will be filed here as well.
Kap

Offline MikeR C

  • Trade Count: (0)
  • Avid Poster
  • **
  • Posts: 178
  • Gender: Male
Re: Breech loader swivel gun (A LOT of pics) drawings...
« Reply #5 on: May 30, 2008, 10:01:33 AM »
Gentlemen,
Thank you for the complements. I almost always make a drawing before I start a project, but do not dimension it, I just use the program to get the dimensions as I need them then delete the dimensions and get others. I have gotten a lot of help from various posts with drawings and now have some idea how much effort was put into them. I VERY much appreciate those efforts.
I decided to return the favor by dimensioning this one and posting it. Thanks again for anyone who has taken the time to provide drawings for us. I have another dimensioned drawing almost done for the CS frame type 24 pounder mortar that Lance and DoubleD helped me with.

Mike & Tracy,
You are right on those dimensions, the way I actually did it was to bore the socket into the barrel then turn the spigot on the chamber until it was a slip fit. The object being to cut down on gas leakage. I was worried about powder fouling making it difficult to insert it after a couple shots, but , so far it hasn't been a problem after about ten shots. I did slightly round the chamber end corner with some wet or dry. I need to study up on tolerances.

Kap,
I posted another picture on the "Nano-Mortar" thread that has a powder can for size reference, along with a page showing where I got the idea. The elevation device came from another source so it isn't really exact scale.

I also seem to have gotten a Kewpie doll, I am not entirely sure of what that means, I just hope its not a suggestion to take up knitting instead of cannon building :)

Thanks again for the kind words...
MikeR C


Offline Tropico

  • GBO Supporter
  • Trade Count: (0)
  • A Real Regular
  • *****
  • Posts: 634
  • Gender: Male
    • Tropico Beach
Re: Breech loader swivel gun (A LOT of pics) drawings...
« Reply #6 on: May 30, 2008, 12:12:21 PM »
Wow., thats quite alot of detail ., the finish looks great as well.

Offline Terry C.

  • Trade Count: (0)
  • Senior Member
  • *****
  • Posts: 1215
  • Gender: Male
  • I see what you did there...
Re: Breech loader swivel gun (A LOT of pics) drawings...
« Reply #7 on: May 30, 2008, 12:40:19 PM »
I almost always make a drawing before I start a project, but do not dimension it, I just use the program to get the dimensions as I need them then delete the dimensions and get others.

That's pretty much the same way I do things. Very few of my working drawings have dimensions, I just pull the dims I need as I go. Most of my stuff is drawn full-size so many flat parts are printed on sticker paper and transferred to the stock.

My projects often get revised several times before a project is finished, dimensions just get in the way.

I only add dimensions to the drawings I need to share.

I really love this little breechloader! Congratulations on a real work of art!

Offline Double D

  • Trade Count: (3)
  • Senior Member
  • *****
  • Posts: 12607
  • SAMCC cannon by Brooks-USA
    • South African Miniature Cannon Club
Re: Breech loader swivel gun (A LOT of pics) drawings...
« Reply #8 on: May 31, 2008, 03:32:19 AM »
I modified your first post in this thread to add the picure frorm your post over in Nano mortar.

I have also linked this post to the safe loads and cannon plans  post stuck to the top of this forum.

Offline dan610324

  • Trade Count: (0)
  • Senior Member
  • *****
  • Posts: 2413
  • Gender: Male
  • bronze cannons and copper stills ;-))
    • dont have
Re: Breech loader swivel gun (A LOT of pics) drawings...
« Reply #9 on: June 01, 2008, 02:41:49 AM »
thats an real beauty , but I must ask how you did to have that finish ??
is it heated and dipped into linseed oil or how have you done it ??
Dan Pettersson
a swedish cannon maniac
interested in early bronze guns

better safe than sorry

Offline Terry C.

  • Trade Count: (0)
  • Senior Member
  • *****
  • Posts: 1215
  • Gender: Male
  • I see what you did there...
Re: Breech loader swivel gun (A LOT of pics) drawings...
« Reply #10 on: June 01, 2008, 05:56:33 AM »
dan610324 read the 8th (if I counted right) paragraph.

I applied a similar watered-down cold blue finish to a .45 CVA cannon kit barrel many years ago. I can't say my results looked as good as Mike's, but it does make for a very antique-looking metal surface.


A well-deserved Kewpie Doll!

Offline MikeR C

  • Trade Count: (0)
  • Avid Poster
  • **
  • Posts: 178
  • Gender: Male
Re: Breech loader swivel gun (A LOT of pics) drawings...
« Reply #11 on: June 01, 2008, 07:47:26 AM »
Dan,
This is roughly how I finished my swivel gun. If it contains to much detail it is because, not being in the US I don't know if you are familiar with the trade names that are common to us.
I probably would have finished to entire thing with a tannin rust conversion product as it provides a nice black passivated coating which is somewhat protective of the metal but requires the metal to be covered with rust. I couldn't figure out a way to quickly rust the 1144 so this is what I did do.
After the band iron (hot rolled mild steel with black scale from the factory rolling) parts were cut out, heated and bent and welded they were REALLY wire brushed with a brush wheel on a grinder, I have the missing patches of skin to prove it, then liberally washed down with Starting fluid. Starting fluid is mostly Ether and methanol, is cheap, drys really fast, and does a pretty good job of degreasing, Try to get the cheap stuff without the upper cylinder lube.

http://www.valvoline.com/pages/products/product_detail.asp?product=41

After degreasing the parts are soaked in a solution of 1 part "Concrete Etchant" to 5 parts distilled water. I brushed them with a steel brush occasionally and after a while all of the scale was removed. Make sure the etchant is phosphoric acit based. Phosphoric eats rust and scale very quickly but sound metal VERY slowly. The acid is pretty easy on skin and is in fact an ingredient in Coca Cola.

http://www.hcconcrete.com/product/3019.asp

The trunnions are attached with Loctite 680 retaining compound. It is very strong and sets in about 10 minutes. If you use it on some metals, stainless steel is one, you will need the primer also. It sets from traces of copper and if there is no copper it no set!

http://www.loctite.us/cps/rde/xchg/henkel_us/hs.xsl/1554_USE_HTML.htm?countryCode=us&BU=ut&parentredDotUID=productfinder&redDotUID=0000000HWK

Then I degreased the now assembled gun with starting fluid again to remove all the finger prints and any other grease.
Note: the starting fluid is not really suited to use indoors. If I have to degrease something inside I use 409 kitchen cleaner, it removes petroleum as well as kitchen grease .

http://www.uclean.com/catalog/productInfo/chemicals/degreasers/formula_409_cleaner_degreaser_disinfectant_32_oz.html

To use 409, I really spray the parts down and use brushes to scrub it all over then rinse completely with very hot water. Then use paper towels to dry them off, the heat from the water helps it dry quicker.
(OT: tired of scrubbing and chipping that carbon of your AR bolt? Pull the bolt out of the carrier, drop in coffee cup, pour in 409, let soak for 30 min, wipe off carbon!)

To apply the bluing, I mixed the Birchwood Casey cold blue, "Super Blue", 1 part with 3 parts distilled water, this helps to keep i from streaking so bad. I used a 2" paint brush and put it on really fast, then kept brushing till every thing was black. I really kept it very wet. Then I just let it drip dry. It turns orange and yellow and black when dry, very ugly. I sprayed it with Break free, a penetrating oil and let it set for a couple of hours then using paper towels buffed it all over to remove the loose stuff. After a a day I buffed it some more and then sprayed more oil on it and wiped the excess off.

http://www.birchwoodcasey.com/sport/index.html

I hope this helps and is not overly confusing...

Thx
MikeR C


Offline dan610324

  • Trade Count: (0)
  • Senior Member
  • *****
  • Posts: 2413
  • Gender: Male
  • bronze cannons and copper stills ;-))
    • dont have
Re: Breech loader swivel gun (A LOT of pics) drawings...
« Reply #12 on: June 01, 2008, 01:38:59 PM »
no problems , I understand it all .
but what I cant understand is how you could get it to be that uneven in colors , its all colors from some yellowish brown up to an almost black blueish tone .
it looks so very antique , when I use an cold blue it always only be blueish black, same color all over .
is the variation in color because you mixed it with water ?? or what ??
Im so extremely impressed by your result there that I must know how you do it   ???
it cant have anything to do with the wire buffing either , that will only make the surface look a little older .
and you degrease it extremely carefully , cant be because of any greasy spots that makes the blue so uneven either .
what I can understand the only possible reason would be the adding of water .   OR ??
Dan Pettersson
a swedish cannon maniac
interested in early bronze guns

better safe than sorry

Offline thelionspaw

  • GBO Supporter
  • Trade Count: (0)
  • A Real Regular
  • *****
  • Posts: 856
  • Gender: Male
  • "HALLOWED GROUND" by RRC
Re: Breech loader swivel gun (A LOT of pics) drawings...
« Reply #13 on: June 04, 2008, 06:05:22 AM »
Thank you for thinking Breechblock. Now I don't feel so lonely. ;D
Protect Freedom of Speech; to identify IDIOTS!

Offline MikeR C

  • Trade Count: (0)
  • Avid Poster
  • **
  • Posts: 178
  • Gender: Male
Re: Breech loader swivel gun (A LOT of pics) drawings...
« Reply #14 on: June 05, 2008, 06:47:41 AM »
Dan,
I think the secret is to really slop the solution on, but do not wipe it off, I just hung it muzzle down and let it drip off and completely dry. I didn't wipe it off with the paper towels until it had completely dried. After I wiped off the dried stuff then I sprayed the breakfree on it.

Lionspaw,
I am actually pretty happy with the design. With modern steels and the ability to machine the mating surfaces gas leakage does not seem to be a problem. it it fast to load without the attendant dangers of getting in front of the muzzle when loading. I am thinking of making a couple more breechblocks so I can fire it faster :). I haven't built a base for it yet. I saw a picture of a base that looked like a heavy duty saw horse with the swivel gun mounteed at one end and the shooter sitting on the other. As I remember the horse sloped down towards the shooter. Wouldn't you know it, I have spent many hours searching, and have not been able to find the pic again. If anyone remembers seeing such a thing I would be eternally gratefull to see a pic or the location of where I could go see it.

Thanks
MikeR C


Offline thelionspaw

  • GBO Supporter
  • Trade Count: (0)
  • A Real Regular
  • *****
  • Posts: 856
  • Gender: Male
  • "HALLOWED GROUND" by RRC
Re: Breech loader swivel gun (A LOT of pics) drawings...
« Reply #15 on: June 12, 2008, 02:24:22 PM »
These are from the same book that I used to make my full sized 15th c. breechblock falcon. Maybe it's a start.

Richard
The Lion's Paw
Protect Freedom of Speech; to identify IDIOTS!

Offline Cat Whisperer

  • Trade Count: (2)
  • Senior Member
  • *****
  • Posts: 7493
  • Gender: Male
  • Pulaski Coehorn Works
Re: Breech loader swivel gun (A LOT of pics) drawings...
« Reply #16 on: June 13, 2008, 12:57:12 PM »
Interesting to see the styles represented in each of the tubes.

Tim K                 www.GBOCANNONS.COM
Cat Whisperer
Chief of Smoke, Pulaski Coehorn Works & Winery
U.S.Army Retired
N 37.05224  W 80.78133 (front door +/- 15 feet)

Offline Terry C.

  • Trade Count: (0)
  • Senior Member
  • *****
  • Posts: 1215
  • Gender: Male
  • I see what you did there...
Re: Breech loader swivel gun (A LOT of pics) drawings...
« Reply #17 on: June 13, 2008, 02:31:53 PM »
The version on the bottom of the first drawiing looks like it would be very stable.

Offline thelionspaw

  • GBO Supporter
  • Trade Count: (0)
  • A Real Regular
  • *****
  • Posts: 856
  • Gender: Male
  • "HALLOWED GROUND" by RRC
Re: Breech loader swivel gun (A LOT of pics) drawings...
« Reply #18 on: June 14, 2008, 02:50:42 PM »
If I had a jewel like your swivel gun,  I'd mount it in proper setting. The trestles I imaged to you yesterday are functional but not imaginative enough for what you have (my opinion) but that's why they make vanilla AND chocolate.  I'd use black walnut or at least red oak. :o
Protect Freedom of Speech; to identify IDIOTS!