Author Topic: 12 pdr coehorn project  (Read 5295 times)

0 Members and 1 Guest are viewing this topic.

Offline CU_Cannon

  • Trade Count: (0)
  • Contributor
  • ***
  • Posts: 343
12 pdr coehorn project
« Reply #30 on: December 22, 2005, 01:40:55 PM »
With the holidays I havenÂ’t had much time to work on my mortar.  My efforts have been diverted to building Christmas presents.  IÂ’m hopping IÂ’ll have some more time after new years.

The steel was shipped ups.  I think 150 lbs is the max that they can ship.

Offline CU_Cannon

  • Trade Count: (0)
  • Contributor
  • ***
  • Posts: 343
12 pdr coehorn project
« Reply #31 on: January 17, 2006, 03:28:42 PM »
I had some time over the weekend to get a little more work done.  The hemispherical bottom is mostly finished.  My follower attachment worked ok but not quite as well as I had hoped.  It is rounded but has a few ridges.  They should be relatively easy to grind smooth with a die grinder.  


Were I to do it again I would use something less springy for the arm with the point that follows the template.  The clear acrylic was not the best choice for the template the clarity made it hard to follow.

Offline rampa room artillery

  • Trade Count: (1)
  • A Real Regular
  • ****
  • Posts: 580
hey
« Reply #32 on: January 17, 2006, 03:53:11 PM »
nice job

Offline Powder keg

  • GBO Sponsor
  • GBO Supporter
  • Trade Count: (0)
  • A Real Regular
  • *****
  • Posts: 752
12 pdr coehorn project
« Reply #33 on: January 17, 2006, 03:58:59 PM »
Question? Is there a stylus or something under the bolt on the right end that contacts the pattern? You just follow it onder hand power, Right? I think I'm getting how a tracer works :oops: Is it hard to setup?

Is this how yours works Kap?
Wesley P.
"Powder Keg"
Custom Machine work done reasonable. I have a small machine shop and foundry. Please let me build your stuff. I just added Metal etching to my capabilities. I specialize in custom jobs.
"When the gun is lost, All is lost"

Offline Cat Whisperer

  • Trade Count: (2)
  • Senior Member
  • *****
  • Posts: 7493
  • Gender: Male
  • Pulaski Coehorn Works
12 pdr coehorn project
« Reply #34 on: January 17, 2006, 04:56:53 PM »
CU - thanks for the pix.  Looks straightforward.  You wanted to beef up the follower?  How thick is it now - looks like 1/4 x 1-1/2 or 2 or thereabouts.  How about a small channel iron?
Tim K                 www.GBOCANNONS.COM
Cat Whisperer
Chief of Smoke, Pulaski Coehorn Works & Winery
U.S.Army Retired
N 37.05224  W 80.78133 (front door +/- 15 feet)

Offline CU_Cannon

  • Trade Count: (0)
  • Contributor
  • ***
  • Posts: 343
12 pdr coehorn project
« Reply #35 on: January 18, 2006, 04:30:24 AM »
The bolt is the stylus.  I wasnÂ’t sure when I built everything the shape I wanted so the bolt allowed me to easily change it.  It also could be adjusted up and down.

The arm is a piece of 1/4 X 2.  The stylus had a bit of an angle to it so it would force the arm up if it went against the template.  A piece of angle of channel would work better.  I would also move the stylus closer to the edge of the arm.  It was in the center which made the template hard to see and follow.

A stouter setup may allow you to stop against the template similar to a lathe stop.  This would improve accuracy.

There would a lot of redesign work if I were to use a system like this again.  For this application it worked ok the tolerances are not critical.  The bottom of the bore needs to more-or-less fit the bottom of the bore so some variations are ok.  The set up would not work for something like a ball mold that requires greater tolerances.

Offline CU_Cannon

  • Trade Count: (0)
  • Contributor
  • ***
  • Posts: 343
12 pdr coehorn project
« Reply #36 on: February 21, 2006, 01:29:15 PM »
It has been a while so I thought an update was in order.  

I havenÂ’t done much work on the barrel.  I haven had any long periods of time to work on it to justify the time needed for setup.  I have worked on some of the hardware for the base.  I have the carriage bolts ready to be welded.  They are made as two parts with the head welded onto the shaft.  I also have a test handle almost finished.  I hope to have all the hardware finished at the same time as the barrel.  It is amazing how long it takes for all the little details.  

I want to have everything together for the first shot.  If I donÂ’t it is entirely possible that the building will stop there.  I should have some time this weekend to work on the barrel some more.

Offline GGaskill

  • Moderator
  • Trade Count: (2)
  • Senior Member
  • *****
  • Posts: 5668
  • Gender: Male
12 pdr coehorn project
« Reply #37 on: February 21, 2006, 01:52:02 PM »
It is amazing how long it takes for all the little details.


The four handles took longer to make than the tube.  And inletting the base took longer than anything else.
GG
“If you're not a liberal at 20, you have no heart; if you're not a conservative at 40, you have no brain.”
--Winston Churchill

Offline CU_Cannon

  • Trade Count: (0)
  • Contributor
  • ***
  • Posts: 343
12 pdr coehorn project
« Reply #38 on: March 05, 2006, 10:09:00 AM »
Here is what I have done on the hardware.  I have about 2 hours into each of the main tie bolts.  Much of that was because I chose to thread them in the lathe.  I need the practice.


The top bolts are not bent they just look like they are from the camera.  I have one finished and 5 ready for welding.  The block on the left is a jig to machine the square portion of the bolts.

Offline CU_Cannon

  • Trade Count: (0)
  • Contributor
  • ***
  • Posts: 343
12 pdr coehorn project
« Reply #39 on: June 04, 2006, 12:10:59 PM »
Well seeing that 16 pdr of quackgr inspired me to get some work done on this project.  I got the powder chamber finally finished and started working on the end profile.  I hope to finish rounding the end over tomorrow evening.  That is if nothing else comes along.


The weight is down to 78 lbs for a total loss of 56 lbs.

Offline CU_Cannon

  • Trade Count: (0)
  • Contributor
  • ***
  • Posts: 343
Re: 12 pdr coehorn project
« Reply #40 on: July 31, 2006, 02:23:25 PM »
This project hit overdrive this past week.  The mortar was to be used in a reenactment.  I’ve known about the reenactment for a while but it still crept up on me.  The mortar is operational but rather rough.  It did not end up being used in the reenactment.  Since I only had fuse for ignition the safety officer didn’t feel comfortable having it on the field.   A lot can happen while the fuse is burning.  I agreed completely.  He did inspect the gun and help me test fire it.  He though I had a very sound gun and said that it would be a fine piece once I got the finish work completed.

Here are a few more building photos.  I would have had more but I didn’t have the time to take them.


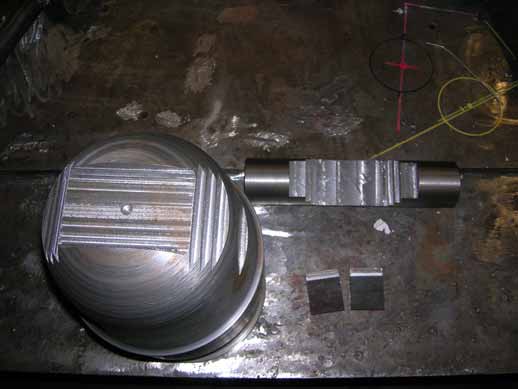
Here are all the parts ready to be welded together.


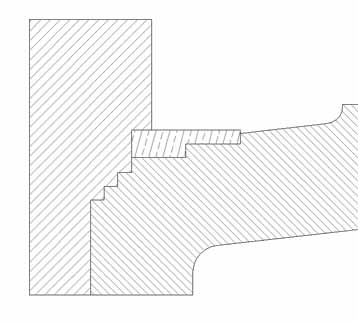
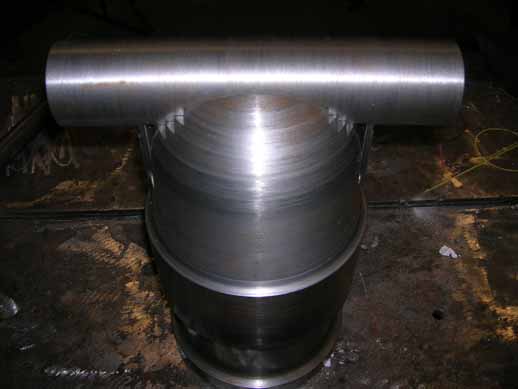
In order to preserve as much wall thickness as possible I came up with a system of steps to fit the trunnion to the breach of the mortar.  I strayed from my original plans due to some dimensional differences but the general design is the same.


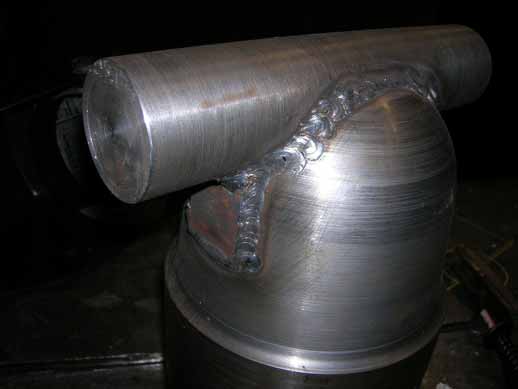
Here are my ugly welds.   A little grinding will smooth everything out.


It doesn’t look too bad.  A little more work and I’ll have a nice mortar.

For those interested the total weight is 125 lbs

Offline Michael Az

  • Trade Count: (0)
  • Avid Poster
  • **
  • Posts: 146
Re: 12 pdr coehorn project
« Reply #41 on: July 31, 2006, 07:40:52 PM »
That looks like a good idea with the trunion. Did you tig or mig? I was wondering if a guy grinds down the weld and then smooths it with body putty if recoil may loosen the putty.  Looks like it is going to be a nice mortar!
Michael

Offline Cat Whisperer

  • Trade Count: (2)
  • Senior Member
  • *****
  • Posts: 7493
  • Gender: Male
  • Pulaski Coehorn Works
Re: 12 pdr coehorn project
« Reply #42 on: August 01, 2006, 06:06:57 AM »
I love to see the innovative solutions matching capabilities to needs!

Tim K                 www.GBOCANNONS.COM
Cat Whisperer
Chief of Smoke, Pulaski Coehorn Works & Winery
U.S.Army Retired
N 37.05224  W 80.78133 (front door +/- 15 feet)

Offline CU_Cannon

  • Trade Count: (0)
  • Contributor
  • ***
  • Posts: 343
Re: 12 pdr coehorn project
« Reply #43 on: August 01, 2006, 03:18:44 PM »
The barrel is mig welded.  I would have preferred to use tig but I’m not all that good at it yet.  It takes me a long time to get a good looking weld.

Offline Rickk

  • GBO Supporter
  • Trade Count: (0)
  • Senior Member
  • *****
  • Posts: 1391
    • http://www.lioby.com
Re: 12 pdr coehorn project
« Reply #44 on: August 01, 2006, 03:31:44 PM »
on metal that thick the weld looks awesome.

 I am assuming you have a 200+ amp machine and are running it high, or are you just way better than me?

Offline CU_Cannon

  • Trade Count: (0)
  • Contributor
  • ***
  • Posts: 343
Re: 12 pdr coehorn project
« Reply #45 on: August 18, 2006, 11:28:43 AM »
The welding was pure skill.  No I used a big miller welder they have at work. 

Here are my drawings.  I posted them elsewhere so I thought they should be here as well.

12 pdr corhorn 1
12 pdr corhorn 2
12 pdr corhorn 3

Offline CU_Cannon

  • Trade Count: (0)
  • Contributor
  • ***
  • Posts: 343
Re: 12 pdr coehorn project
« Reply #46 on: October 10, 2006, 03:52:36 PM »
I got to shoot my mortar over the weekend at a Civil War reenactment.  It sounded great with 4 oz of powder.


Here it is with everything painted up.

This was a fun project but I’m glad it is finally finished.

Offline Michael Az

  • Trade Count: (0)
  • Avid Poster
  • **
  • Posts: 146
Re: 12 pdr coehorn project
« Reply #47 on: October 10, 2006, 07:03:15 PM »
Looks great!
Michael

Offline GGaskill

  • Moderator
  • Trade Count: (2)
  • Senior Member
  • *****
  • Posts: 5668
  • Gender: Male
Re: 12 pdr coehorn project
« Reply #48 on: October 11, 2006, 08:37:11 AM »
So what did you use for ignition?  Doesn't look like quill and linstock or electrical.
GG
“If you're not a liberal at 20, you have no heart; if you're not a conservative at 40, you have no brain.”
--Winston Churchill

Offline Rickk

  • GBO Supporter
  • Trade Count: (0)
  • Senior Member
  • *****
  • Posts: 1391
    • http://www.lioby.com
Re: 12 pdr coehorn project
« Reply #49 on: October 11, 2006, 09:05:30 AM »
4 ounces of powder didn't all fit in that powder chamber did it?

Offline CU_Cannon

  • Trade Count: (0)
  • Contributor
  • ***
  • Posts: 343
Re: 12 pdr coehorn project
« Reply #50 on: October 13, 2006, 01:51:24 AM »
The 4 oz fit; there wasn’t much room to spare though.  The muzzle blast is amazing.  I can’t wait to do some night shooting.  I want to get some more experience with it first though. 

I used friction primers for ignition.  They worked great.  The key was to stay low and to the side so the primer wouldn’t pull out. 

I liked the friction primers but I think I’m going to put a lock assembly together this winter.  I plan on making it easily removable so I can switch to primers or fuse if I want. 

Offline firebuckeye

  • Trade Count: (0)
  • Member
  • *
  • Posts: 59
Re: 12 pdr coehorn project
« Reply #51 on: January 15, 2007, 03:52:25 AM »
with that big of a bore what do you shoot for blanks, just a salute?  Would it be bad to not bore it all the way out and just leave everything else the same?  What were you shooting in your photo.  That is an awesome coehorn.