I seem to have run across several articles describing how to make capsquares or trunnion straps, but usually large ones. This is how I make smaller ones. There are some photos after the text that I hope will clarify my written instructions.
This jig can be made without machine tools, using just a drill press, and does a pretty good job of bending a strip into a capsquare. I don't know how big a strip it would bend, the piece shown with the jig is 1/2" wide and .065 thick. I'm sure it would bend steel as well, possibly a much larger piece if it was heated red hot before bending.
To make a jig you will need a length of 1/4" or so steel rod for the registration pins. A length of key stock or some sort of square steel stock as wide or wider than the finished capsquares, and a short length of steel round bar the same diameter as your trunnions.
The first step is to cut off two pieces of the the key stock 2" or so longer than the length of your capsquare blank. Keep in mind that the blank will need to be longer than the finished capsquare. Sand or file or whatever one side of each piece of key stock so that they are flat and smooth. A rough surface will tear up the surface of the blank. Stack the two pieces on top of each other, smooth faces together, and glue them with super glue, or securely clamp them together. Scribe a line, centered from each end, up one side and across the top of the stack. On the top of the stack, center punch for the two registration pins, they should be centered on the stock and spaced the length of your capsquare blank plus half the diameter of each pin. You can space them a bit farther apart to allow for trimming the capsquares to length after forming in case the blank moves while being formed. Center this space using the line scribed across the top of the stack. Using a drill bit the same size as your registration pins, drill two holes, all the way through the stack. The registration pin stock should be a sliding fit in the holes. Separate the two pieces, a sharp blow will usually break a super glue bond.
Take the bottom piece of key stock and set it with the scribe mark up, smooth face on one side. Clamp a scrap piece of the key stock to the smooth face and center punch at the end of the scribed line where it ends between the two pieces. Drill the center punch with a bit the same size as your trunnion. This hole should be a slip fit on the trunnion sized round steel bar.
Take the top piece of key stock and set it with the scribe mark up, smooth face on one side. Clamp a scrap piece of the key stock to the smooth face and center punch at the end of the scribed line where it ends between the two pieces. Select a drill bit sized twice the thickness of the cap square material plus the diameter of your trunnion. The one in the photos was 2 times .065 plus 1/2", .625 or 5/8" bit. Drill the center punch.
Cut two pieces of your registration pin stock slightly shorter than the two pieces of key stock when they are stacked together. Bevel one end of each pin, Stack the two drilled pieces of key stock together and insert the pins through both pieces, make sure the scribed lines are on the same side of the stack, and that the pins are below the surface. Glue the pins into the top piece and separate the pieces.
File the edges where the arc meets the smooth face, of the top piece, to a small radius. Make sure this radius is very smooth or it will make deep scratches in your finished cap square.
Cut the round steel bar slightly longer than the key stock is wide. You can glue this into the bottom piece of key stock or just leave it loose.
Cut a suitable piece of brass to fit between the registration pins and no wider than your key stock. Anneal it by heating it red hot and letting it cool or drop it into water.
Using a good heavy grease, grease one side of the cap square blanks. Assemble the jig and place the brass strip into the jig with the greased side towards the larger arc. Make sure the brass blank is flush along one edge of the jig to keep it straight. Insert the short steel bar if you didn't glue it in, you may have to start the bend to get it into the jig. Place the jig into a vise and tighten it down. It wouldn't hurt to reheat the brass blank after bending it three quarters of the way. This will make it dead soft and help prevent spring back. Put the brass back in to the jig with more grease, the same way it came out, and tighten the vise down all the way. Loosen the vise and separate the jig, you should have a nicely formed cap square.
The finished capsquare in the photo had a short piece of brass rod silver soldered to both ends to make them look cast then blackened.
Notes:
If you build the jig as described above your trunnion will set exactly half it's diameter into the carriage sides with the thickness of the capsquare above the carriage side.
If you do not space the registration pins using the line scribed across the top of the stack of key stock your cap square will have different length "legs", you may want this on purpose.
If you tip up one end of the pieces of the key stock as you are drilling the two arcs your cap squares can be used on a carriage where the sides are not parallel. The finished cap squares in the photo are on a naval carriage with angled sides.
Photo of the jig showing the jig, the steel bar insert, and a sample capsquare.
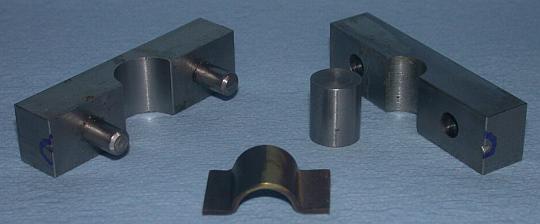
Photo showing the jig as it looks just out of the vise. The scribe marks are on the back so you don't see them.
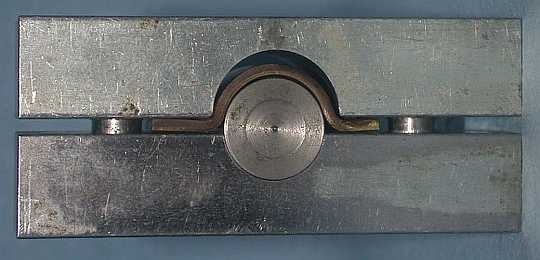
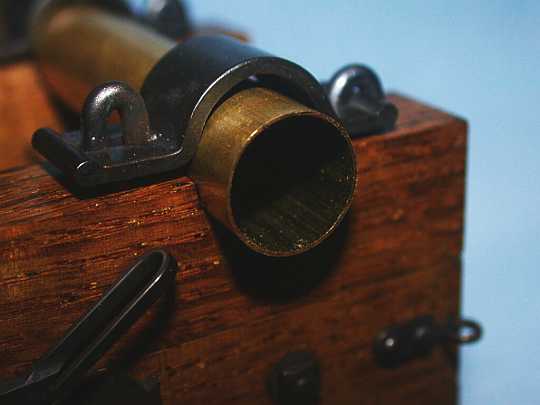
Photo showing a finished capsquare with a 1/2" tube instead of a trunnion.
I hope this turns out to be useful for someone. They don't take all that much time to make, especially if you use a milling machine instead of a drill press.
Thank you,
MikeR C

