Author Topic: Building the 3/4" bore "Dictator"  (Read 1024 times)

0 Members and 1 Guest are viewing this topic.

Offline shred

  • Trade Count: (0)
  • Avid Poster
  • **
  • Posts: 156
Building the 3/4" bore "Dictator"
« on: July 16, 2011, 03:26:07 PM »
As promised in the load thread (http://www.gboreloaded.com/forums/index.php/topic,237340.msg1099344766.html), here's some pictures of building my 3/4" bore 13" seacoast M-1861.

While it felt like I was taking pictures all the time, it turns out I don't have any of the little bits and fittings being made.  Sorry about that.

Cutting a chunk off the 3" bar.


Turning one end down to 2.7"


Boring (note full size stock in chuck jaws)


Boring the trunnion holes.   Not visible in the picture is the undersize trunnion on the other side indexing the tube so they're 180' apart.


I don't have a ball-turner that will do a 3" ball, so I got all fancy and decided to 3-axis CNC it (it's nice to have options, albeit not very traditional  8) ).  Trunnions are installed to make gripping in the vise better.


Many hours later (the ball turner would be much faster)...


So back to the lathe and some filing-blending work (notice the combo jaw padding and early-warning-system for files straying too close to the trunnions):


Drill the vent & make the lifting eye and all that's needed to the tube is making and soldering on the elevating lugs (I made them as one piece versus the individually-threaded ones in the larger plans)


Offline shred

  • Trade Count: (0)
  • Avid Poster
  • **
  • Posts: 156
Re: Building the 3/4" bore "Dictator"
« Reply #1 on: July 16, 2011, 03:40:56 PM »
On to the carriage...

The Green plans have you bolting angle-iron to the sides of flats to make the flanges around the carriage.  I suspect the originals have two plates bolted together but don't know.  Not sourcing any 1/8" x 1/16" angle iron, I took the other road and CNCed the side plates whole out of 1/4" plate scraps.

First, drilling all the bolt holes.  Most of these are now decorative since they aren't holding any angle-iron on.  I added a bunch more for looks and to be more consistent with the originals (especially under the trunnions) since I wasn't the one doing all the drilling  ;)   (I was, however later on the one doing all the bolting  :P )


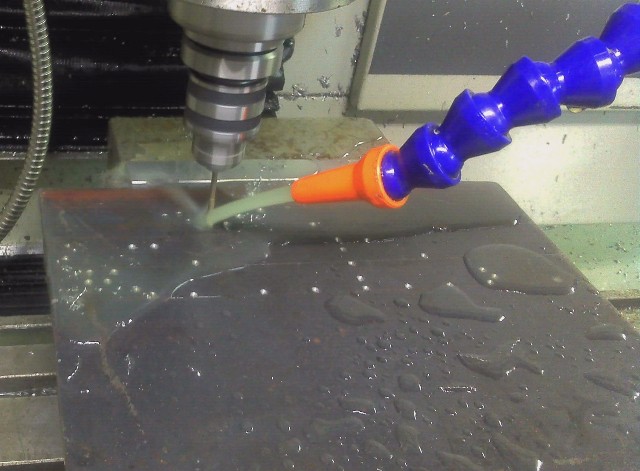
After much scooting of pixels on the computer-- start pocketing out most of the plate, leaving 1/16" lip at the edge.


When that's all done (like eyeglasses, in about an hour), they are cut out and with some deburring, look like this (the wheels are separate, only there to prop up the plate for photos at this point)
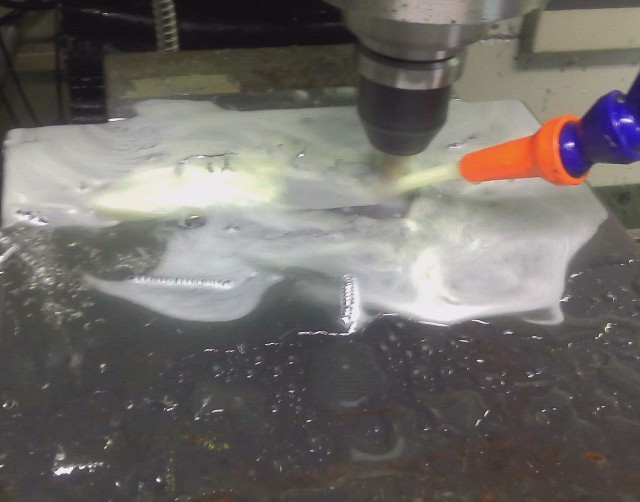
The rear jacking pads and reinforcement are also pocketed out during the cutout operation.


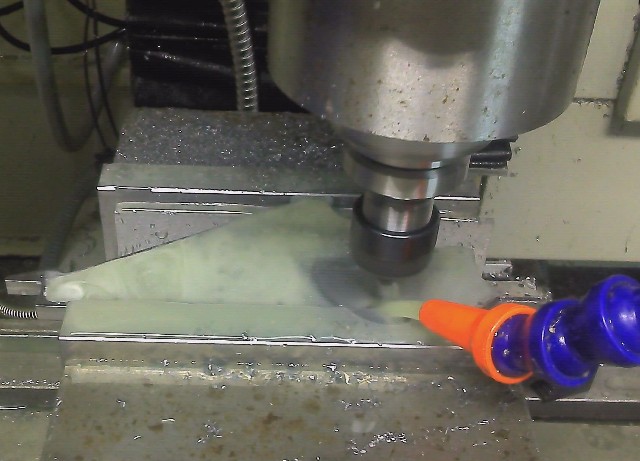
Now you have to take your beautiful plate and trust it to the machine for another two hours to do the other side (since there's only a small flat spot to hold the part in the vise, I used a smaller bit and took lighter cuts.  It is not fun when a bit breaks partway through.


Now do all that over again to make the other plate...

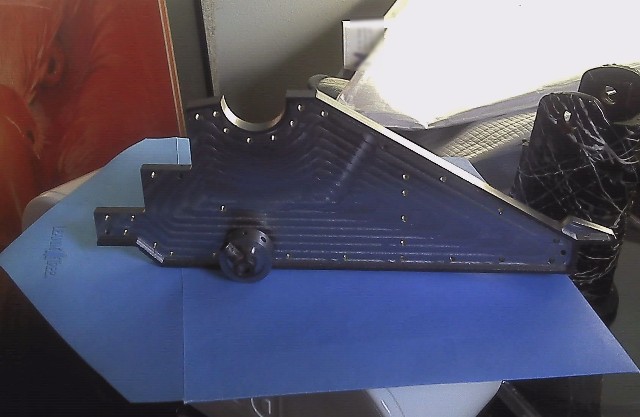
Bolt it all up, make some trunnion caps, transoms and angle brackets

Silver solder the transoms to the angle brackets and silver solder a set of 4-40 studs (set screws) into the top of the frame for the trunnion caps to bolt to (hence the blackening of my previously beautiful shiny CNC parts) and install close to 100 decorative 2-56 screws and nuts, and here we are ready to defend Fort Treadwell from enemies Foreign and Domestic.


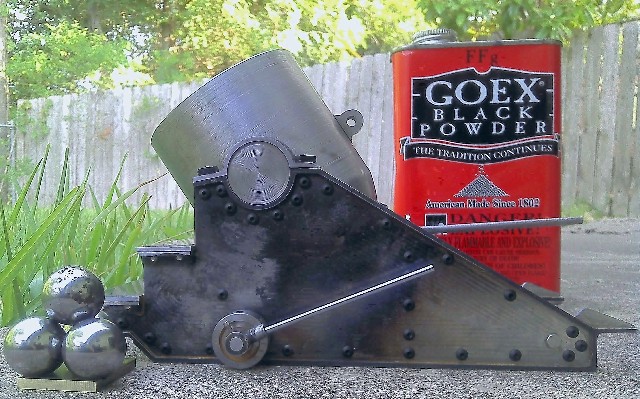
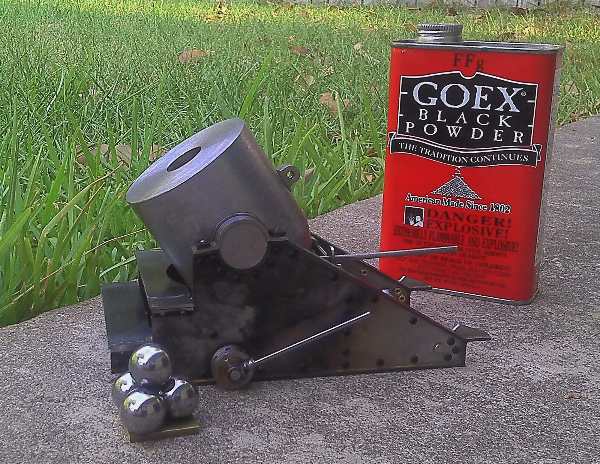
It still needs a good sandblasting and coat of paint, but it's about done.

Offline shred

  • Trade Count: (0)
  • Avid Poster
  • **
  • Posts: 156
Re: Building the 3/4" bore "Dictator"
« Reply #2 on: July 16, 2011, 03:49:22 PM »
Here's the original photo I was working off.  Not all the bolts are there or in quite the right spots, but I'll take it.


Offline Zulu

  • Trade Count: (0)
  • Senior Member
  • *****
  • Posts: 2477
  • Honor is a gift a man gives himself.
    • Wood & Ironworks
Re: Building the 3/4" bore "Dictator"
« Reply #3 on: July 16, 2011, 04:39:58 PM »
I totally envy you folks who have metal lathe and mill working experience.  I long for the challenge of making a real barrel! 8)   I have just never been exposed to it. :-\
Zulu
Zulu's website
www.jmelledge.com

Offline Double D

  • Trade Count: (3)
  • Senior Member
  • *****
  • Posts: 12607
  • SAMCC cannon by Brooks-USA
    • South African Miniature Cannon Club
Re: Building the 3/4" bore "Dictator"
« Reply #4 on: July 16, 2011, 04:59:01 PM »
I totally envy you folks who have metal lathe and mill working experience.  I long for the challenge of making a real barrel! 8)   I have just never been exposed to it. :-\
Zulu

Yeah but he is a step beyond, he has CNC to work with!!!  No Fair!!!

Offline keith44

  • Trade Count: (2)
  • Senior Member
  • *****
  • Posts: 2748
  • Gender: Male
Re: Building the 3/4" bore "Dictator"
« Reply #5 on: July 16, 2011, 09:05:35 PM »
Zulu your talent with woodworking speaks for itself. You should not be envious of anyone.
 
 
keep em talkin' while I reload
Life member NRA

Offline shooter2

  • Trade Count: (0)
  • Avid Poster
  • **
  • Posts: 166
  • Gender: Male
  • To err is Human, to ARR is Pirate.
Re: Building the 3/4" bore "Dictator"
« Reply #6 on: July 17, 2011, 01:21:05 AM »
Shred,
           Lovely work and detailing.  I know how hard it is to get every detail right and I often fail.  You have succeeded however at a very high level.  By coincidence my next project was going to be a Dictator Mortar based on William Green's plans but in Golfball Calibre.  You have inspired me to get on with it. 

Pity you do not have any detail shots of the ratchet being attached.  That area bothers me as well.  Can you post any pics of the completed project from the rear showing the ratchet and lever?

kindest regards
shooter2
We are the Guns and your masters!
Saw ye our flashes?
Heard ye the scream of our shells in the night, and the shuddering crashes?

'The Voice of the Guns'
Captain Gilbert Frankau Royal Artillery 1916

Offline shred

  • Trade Count: (0)
  • Avid Poster
  • **
  • Posts: 156
Re: Building the 3/4" bore "Dictator"
« Reply #7 on: July 17, 2011, 05:47:31 AM »

Thanks Guys.

Zulu, I've seen your impressive wood work.  I bet you could pick up metalworking lathe skills in no time--- I'm self-taught (do lots of reading though!) and only started a few years ago.  The CNC side of things is fun to me (I have Robot Minions!  ::) ), but not required for something like this-- after all, back-in-the-day, they were probably laying these out with a tape measure and chalk right on the side of some boilerplate...  In any larger size, milling the side plates out of solid just to get a 1/16" lip would be silly. 

Pity you do not have any detail shots of the ratchet being attached.  That area bothers me as well.  Can you post any pics of the completed project from the rear showing the ratchet and lever?
Here's the ratchet-end being eyeballed by the house dragon.  It's one of the most-needy of solder cleanup and paint..


I milled a little strip of ratchet lugs, bent it and soldered it on as there was no room for other attachment.  The full-size ones had a bar at the bottom of the lugs cast in anyway, so it worked a lot easier than trying to time out five tiny screw-in lugs (just timing the top lug was enough of a nuisance).  I located them a little differently than Green did as I think he starts them too high off the center line.

In a fit of correctness I made the elevating bracket lever loop a separate part, but by the time it scales down that far you can't get 2-56 hex-head screws to fit, so I'm stuck with SHCS holding it on or sourcing some even tinier hex bolts.   You might consider making the loop as part of the plate for expediency.

IIRC the original plans are close to golf-ball bore (1.625" or so), so you could probably bore the tube out to the needed windage and be good to go on the rest of the plans.


Offline Cat Whisperer

  • Trade Count: (2)
  • Senior Member
  • *****
  • Posts: 7493
  • Gender: Male
  • Pulaski Coehorn Works
Re: Building the 3/4" bore "Dictator"
« Reply #8 on: July 17, 2011, 07:49:24 AM »
I totally envy you folks who have metal lathe and mill working experience.  I long for the challenge of making a real barrel! 8)   I have just never been exposed to it. :-\
Zulu

Yeah but he is a step beyond, he has CNC to work with!!!  No Fair!!!

On the contrary!  I admire folks that do what ever it takes with the tools at hand.

Fair - yes.

Am I jealous?  YES!

Tim K                 www.GBOCANNONS.COM
Cat Whisperer
Chief of Smoke, Pulaski Coehorn Works & Winery
U.S.Army Retired
N 37.05224  W 80.78133 (front door +/- 15 feet)

Offline Cat Whisperer

  • Trade Count: (2)
  • Senior Member
  • *****
  • Posts: 7493
  • Gender: Male
  • Pulaski Coehorn Works
Re: Building the 3/4" bore "Dictator"
« Reply #9 on: July 17, 2011, 07:53:18 AM »
...

Boring the trunnion holes.   Not visible in the picture is the undersize trunnion on the other side indexing the tube so they're 180' apart.


...

Was it just a cylinder, or did you make a wider fixture for it?

Cool idea - this is one of those things that is difficult to do without a 'trick' or a lot of tooling.
Tim K                 www.GBOCANNONS.COM
Cat Whisperer
Chief of Smoke, Pulaski Coehorn Works & Winery
U.S.Army Retired
N 37.05224  W 80.78133 (front door +/- 15 feet)

Offline gulfcoastblackpowder

  • GBO Supporter
  • Trade Count: (0)
  • A Real Regular
  • *****
  • Posts: 808
Re: Building the 3/4" bore "Dictator"
« Reply #10 on: July 17, 2011, 09:00:16 AM »
Excellent work!  I love your attention to detail, and have always liked the looks of the Dictator.  It's one of the few mortars that really interest me.  Definitely post a picture once you have the it painted!

Offline shred

  • Trade Count: (0)
  • Avid Poster
  • **
  • Posts: 156
Re: Building the 3/4" bore "Dictator"
« Reply #11 on: July 17, 2011, 09:45:39 AM »
...

Boring the trunnion holes.   Not visible in the picture is the undersize trunnion on the other side indexing the tube so they're 180' apart.

...

Was it just a cylinder, or did you make a wider fixture for it?

Cool idea - this is one of those things that is difficult to do without a 'trick' or a lot of tooling.
It was just a little flat-ended cylinder that was a slip fit into the first trunnion pocket (that was flat-bottomed from the first boring operation which helped).  It's one of those 'good enough' tricks-- a wider fixture would be somewhat more accurate and for production use, you'd make a cradle fixture or something.  I lapped in the trunnions to fit the carriage with some grinding compound at the end so a little bit of misalignment could be tolerated if it appeared.

Once you have two trunnions in, indexing the vent and lift eye and so on is easy.  It's also a lot more secure in the vise.  Round stock doesn't otherwise like to stay put without faffing around with V-blocks.

Offline Cat Whisperer

  • Trade Count: (2)
  • Senior Member
  • *****
  • Posts: 7493
  • Gender: Male
  • Pulaski Coehorn Works
Re: Building the 3/4" bore "Dictator"
« Reply #12 on: July 18, 2011, 02:11:58 AM »
Thanks!

 :D :D :D
Tim K                 www.GBOCANNONS.COM
Cat Whisperer
Chief of Smoke, Pulaski Coehorn Works & Winery
U.S.Army Retired
N 37.05224  W 80.78133 (front door +/- 15 feet)

Offline dominick

  • GBO Sponsor
  • Trade Count: (21)
  • Senior Member
  • *****
  • Posts: 1367
  • Gender: Male
    • Black Powder Cannons & Mortars
Re: Building the 3/4" bore "Dictator"
« Reply #13 on: July 18, 2011, 01:57:46 PM »
shred,  Nice work on the mortar!  Dom