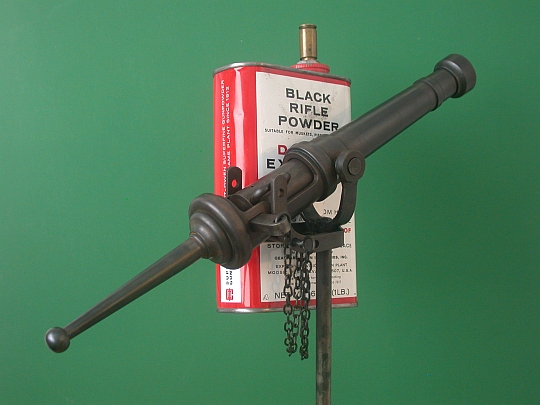
The pic below is of the breach loader this thread got me started on. It shoots firecrackers.


Let me preface the following with the fact that I am not a draftsman, have very little experience with dimensioning a drawing, nor know the rules about how to actually correctly generate a drawing. The last drafting class I took we used burnt sticks on the cave wall. I hope this method will work for distributing drawings, my CAD program will not export drawings in any kind of useful format so I broke the drawings up and took screen prints. If I have missed a dimension somewhere let me know and I will post an updated sheet. I am attaching the drawings as opposed to hosting them because of so many missing photos as the posts age.
The cannon was designed to shoot 1 1/2" firecrackers although I don't doubt it would shoot other projectiles as well. The charge is one .22 case full of crushed FFFFG using a piece of 1mm fuse from Skylighter.com (Visco, Cross-Match). Some of the dimensions are a little goofy, why make something 1.894" you ask? I re drew it from "as built" as I went along. There are no really precision fits except where the barrel fits the breech, where the chamber fits into the barrel, and where the key fits behind the chamber to push it tight into the back of the barrel.
The entire cannon is made from steel, in my case the barrel, breech, and chamber is made from 1144 stresspruf and the remainder from mild steel. Flat pieces are made from hardware-store 1/8" band iron, 1/2" wide. The key for the breech block is 1/4" band iron.
The barrel was sweat soft soldered (the CORRECT use of sweat

) into the breech using solder paste (powdered solder mixed with flux it sweats real good). After the yoke was made, pockets were drilled into the barrel through the breech then the trunnions were fastened into the pockets withLocktite 680 bearing retainig compound. Everything else was welded. You can put it together with whatever you are comfortable with.
The tail is attached with a 1/4-20 stud flush with the inside of the breech and secured with 680 retaining compound.
If I had it to do it over there are a few things I would have done differently. I would have made the bore 9/32" instead of 5/16". I would have used 12L14 at least for the breech, boring the taper on the inside, blind, in 1144 was tough on a cheap Chinese lathe. I would have made the breech longer so the chamber could be a bit longer for a bigger charge. As it stands now the .22 shell full puts the end of the 1 1/4" firecracker right at the end of the chamber. I'm going to try for 1" firecrackers this 4th. However I shot it quite a bit over the holiday and a .22 shell full of powder made quite the bang, I'm not so sure I would lengthen it.
Watch the preponderance (balance), I was a little worried but it came out all right.(even without the chamber it is still breech heavy). There is no taper specified, I do not have a taper attachment so I just set the compound close as I could then did everything at that setting.
Each piece including barrel was very roughly wire brushed on a grinder to give it a blotchy appearance and take off the sharp machined edges. The finish in the photo is Birchwood Casey cold blue mixed with 3 parts of distilled water, brushed on with a 1" brush till it is all black then let dry. It turns all rusty looking then I oiled it and slightly wiped it down with a paper towel, I wanted it blotchy looking, Saltwater is hell on those wrought iron swivel guns!
The chain should be pretty self explanatory. To rods of different size, in this case a .125" and a .093" are wrapped with 18 gauge black iron wire and then a Dremel tool with a thin abrasive wheel is used to split the wraps as close to the middle of the large rod as you can. The loops are linked together and closed with pliers. The result of using two different sized rods is that the links come out oblong instead of round.
I hope these drawings turn out to be a useful way of providing drawings and that I haven't forgotten too many of the details.
Thanx
MikeR C