Author Topic: Here goes Nothin (mortar project)  (Read 2641 times)

0 Members and 1 Guest are viewing this topic.

Offline Mortarmer B

  • Trade Count: (0)
  • Member
  • *
  • Posts: 12
  • Gender: Male
Here goes Nothin (mortar project)
« on: May 04, 2007, 10:48:05 AM »
Well, I’m on my way to starting a dangerous obsession. I started my project this week. 

I’m using CU Cannons drawing to create my first golf ball mortar.  I’m using a hunk of STAINLESS that came out of a pump shaft.  Certainly not ideal, but do-able, free, and conscience clear if I screw up the machining.  This is more or less practice.  See, this isn’t just my first artillery project, it’s my first metal working project period, it’s like I’m feeling around in the dark trying not to stub my toes.

Here are the steps I’ve gone through thus far:
    1) Cut stock to length, and faced muzzle end.
    2) Bored 1/2” dia. hole full length of bore to powder chamber (5”).
    3) Bored 1.5” hole nearly to length of flutes on bit (2.75” deep)
    4) Used boring bar to increase bore dia. to ~1.7” (near finish) for the first three inches that were done in step 3.  I was told to do this for chip clearance.
    5) SLOWLY bored with 1.5” bit to a depth of 3 7/16 (this is the depth at which the ½” radius to the powder chamber begins).  I went just far enough to fill the flutes    with chips, then would back the bit out and clear the hole. 
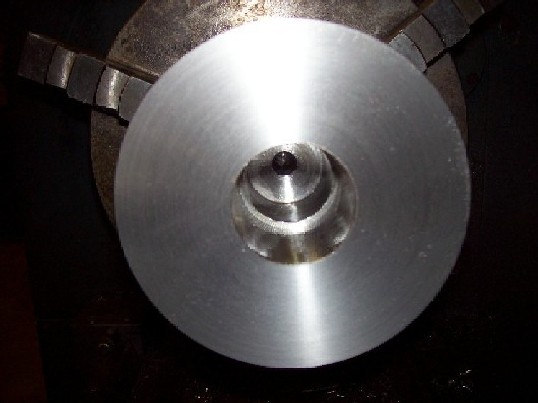


Next I need to:
   6) Use the boring bar to get  to near finish bore dia. on the final inch or so of bore.
   7) Radius powder chamber and bore bottom.

HELP:  I need to know how to go about putting this radius in the powder chamber and bore bottom.  Can I grind the harden the radius in a piece of flatbar and use that to cut the radius. 

See attached pictures for my progress.  I will update as I go.  Hopefully I can help someone like myself in the future.

Offline Mortarmer B

  • Trade Count: (0)
  • Member
  • *
  • Posts: 12
  • Gender: Male
Re: Here goes Nothin
« Reply #1 on: May 04, 2007, 10:55:53 AM »
I'll post pictures later, I have to get the whole size/hosting thing taken care of.


Offline jeeper1

  • Trade Count: (0)
  • A Real Regular
  • ****
  • Posts: 662
  • Gender: Male
Re: Here goes Nothin (mortar project)
« Reply #2 on: May 04, 2007, 11:06:29 AM »
Quote
Do I need to be hosting this pictures somewhere and attaching them with the http address?
Yes, I recomend https://www.gboreloaded.com/mhp/.
I may not be completely sane, but at least I don't think I have the power to influence the weather.

Offline GGaskill

  • Moderator
  • Trade Count: (2)
  • Senior Member
  • *****
  • Posts: 5668
  • Gender: Male
Re: Here goes Nothin (mortar project)
« Reply #3 on: May 04, 2007, 03:37:29 PM »
Can I grind the harden the radius in a piece of flatbar and use that to cut the radius.

This will not likely work for at least a couple of reasons.  First you will get intense chatter from the bar vibrating as you try the cut.  Second, the bar would need to be harder than the metal you are cutting to be able to cut it at all.

Your best bet is to do some rectangular interpolation, which is to act like a computer controlled machine and make the curved cut in a series of steps which are later smoothed out with abrasive paper on a rounded stick.  The finer the cuts, the easier the finishing will be but the more boring the cutting process will be.  You will need a dial indicator on the lathe bed for this process.

If you have a milling machine and a rotary table, you could set them up with the barrel chucked vertically and use a large ball nose end mill to finish the process.  The radius would not be perfect but pretty close if you used a 1.5" end mill.
GG
“If you're not a liberal at 20, you have no heart; if you're not a conservative at 40, you have no brain.”
--Winston Churchill

Offline The Shootist

  • Trade Count: (0)
  • Member
  • *
  • Posts: 13
Re: Here goes Nothin (mortar project)
« Reply #4 on: May 05, 2007, 04:35:30 PM »
You can grind the 1.5" bit to a round point and use that to finish the hole. At least that's what I did with the Cohorn that I'm making as my 1st project.  ;)

Offline Mortarmer B

  • Trade Count: (0)
  • Member
  • *
  • Posts: 12
  • Gender: Male
Re: Here goes Nothin (mortar project)
« Reply #5 on: May 07, 2007, 07:47:05 AM »
I found an old chipped 1" bit that I will grind for the powder chamber.  But the 1.5" bit I used to rough the bore is too nice, new, and expensive to do that with.  I will do like G suggested for that .5" bore radius.  I used excel to graph and calculate the the y coordinate for every x coordintate +.01" for the radius of the butt of the mortar, I'll do the same for the inside radius and use the ol' stick and emory cloth trick to get those steps out.  Thanks so much for the advice.

I'm getting ready to mill the muzzle ring, and the powder chamber reinforcement ring, will the muzzle ring (5/8") be able to stand the abuse of being chucked in the lathe when I flip my blank and while I turn that 1.75" radius on the butt??  That will be the only area the chuck jaws will contact once I mill away that little recess at the tip of the muzzle, and the area between the muzzle ring and the powder r. ring. 


Offline GGaskill

  • Moderator
  • Trade Count: (2)
  • Senior Member
  • *****
  • Posts: 5668
  • Gender: Male
Re: Here goes Nothin (mortar project)
« Reply #6 on: May 07, 2007, 08:43:32 AM »
I will do like G suggested for that .5" bore radius.

If you are going to the trouble of radiusing the bottom of the bore, you should make the radius the same as the radius of the bore so the ball can seat flush.
GG
“If you're not a liberal at 20, you have no heart; if you're not a conservative at 40, you have no brain.”
--Winston Churchill

Offline Cat Whisperer

  • Trade Count: (2)
  • Senior Member
  • *****
  • Posts: 7493
  • Gender: Male
  • Pulaski Coehorn Works
Re: Here goes Nothin (mortar project)
« Reply #7 on: May 07, 2007, 03:01:41 PM »
....   I need to know how to go about putting this radius in the powder chamber and bore bottom.  Can I grind the harden the radius in a piece of flatbar and use that to cut the radius. 
....

Here's a picture of a 1" diameter spade drill bit with rounded corners.  You could do the same as you've suggested.  I drilled in about a foot or so and then switched to this bit.  Spade drills tend not to like pilot holes (I guess they get support from the sides.)  You could do the same with a twist drill.  Watch (as you already know) lubrication and chip clearing.

Tim K                 www.GBOCANNONS.COM
Cat Whisperer
Chief of Smoke, Pulaski Coehorn Works & Winery
U.S.Army Retired
N 37.05224  W 80.78133 (front door +/- 15 feet)

Offline Cat Whisperer

  • Trade Count: (2)
  • Senior Member
  • *****
  • Posts: 7493
  • Gender: Male
  • Pulaski Coehorn Works
Re: Here goes Nothin (mortar project)
« Reply #8 on: May 07, 2007, 03:13:42 PM »
....
I'm getting ready to mill the muzzle ring, and the powder chamber reinforcement ring, will the muzzle ring (5/8") be able to stand the abuse of being chucked in the lathe when I flip my blank and while I turn that 1.75" radius on the butt??  That will be the only area the chuck jaws will contact once I mill away that little recess at the tip of the muzzle, and the area between the muzzle ring and the powder r. ring. 

That is the dilemma!  A steady rest will help.  You're restricted to light cuts.  Take off as much as you can at a 45 degree angle to ease roughing it out.

I built a radius cutter for my 6" diameter golf ball  mortar.
Tim K                 www.GBOCANNONS.COM
Cat Whisperer
Chief of Smoke, Pulaski Coehorn Works & Winery
U.S.Army Retired
N 37.05224  W 80.78133 (front door +/- 15 feet)

Offline Cat Whisperer

  • Trade Count: (2)
  • Senior Member
  • *****
  • Posts: 7493
  • Gender: Male
  • Pulaski Coehorn Works
Re: Here goes Nothin (mortar project)
« Reply #9 on: May 07, 2007, 03:25:33 PM »
.... will the muzzle ring (5/8") be able to stand the abuse of being chucked in the lathe when I flip my blank and while I turn that 1.75" radius on the butt?? 
....

Here's a shot of the smaller of two radius cutters I've made.

Tim K                 www.GBOCANNONS.COM
Cat Whisperer
Chief of Smoke, Pulaski Coehorn Works & Winery
U.S.Army Retired
N 37.05224  W 80.78133 (front door +/- 15 feet)

Offline GGaskill

  • Moderator
  • Trade Count: (2)
  • Senior Member
  • *****
  • Posts: 5668
  • Gender: Male
Re: Here goes Nothin (mortar project)
« Reply #10 on: May 07, 2007, 04:35:12 PM »
I'm getting ready to mill the muzzle ring, and the powder chamber reinforcement ring, will the muzzle ring (5/8") be able to stand the abuse of being chucked in the lathe when I flip my blank and while I turn that 1.75" radius on the butt??

Before you start cutting the radius, center drill the breech end no deeper than the trunnion radius and use a rotating center in the tailstock to hold up the outer end and maintain pressure on the chuck.  You will cut away the area of the center drill hole to make a trough for the trunnion so nothing will be hurt by putting in the extra hole and you don't need to get closer to center than the radius of the trunnion.
GG
“If you're not a liberal at 20, you have no heart; if you're not a conservative at 40, you have no brain.”
--Winston Churchill

Offline CU_Cannon

  • Trade Count: (0)
  • Contributor
  • ***
  • Posts: 343
Re: Here goes Nothin (mortar project)
« Reply #11 on: May 08, 2007, 03:48:03 AM »
I finished the chamber on mine with a ball end mill.  The bottom of the bore on mine ended up being cut flat at a 30 degree angle with a small radius in the corrners.  This allowed the ball to seat well but was much easer to make than a spherical bore would be.

I rounded the end as GG has described.  When you cut the grove for the trunnion the center is removed anyway.  To cut the grove I used a homemade fly cutter.

Offline Mortarmer B

  • Trade Count: (0)
  • Member
  • *
  • Posts: 12
  • Gender: Male
Re: Here goes Nothin (mortar project)
« Reply #12 on: May 08, 2007, 03:35:34 PM »
Finished the powder chamber with my ground 1" bit.  It was VERY slow going.  I don't know if I didn't grind a good edge on it or what, but it wouldn't pull much of a chip.  I made sure to keep the bit cool while grinding.  For future reference, should I leave the cutting edge a little proud of the rest of the radiused edge for a better bite?

I was holding off on the last 1" of bore shaping ('cause I was dreading it).  Seeing how CU used a shallow angle in the bottom of the bore, I'm going to go on and drill out the rest with the 1.5" bit, the angle on which is around 30 or so.  Then bore the rest to final dia. and leave a small radius in the corner with a ground cutter attached to a bar.

I found a rotating center that I will put into use for the butt end.  Thanks for the heads up on that one, a definate tripping spot for me.
 
Thats a swell looking radius cutter, but it looks like its beyond my scope at this time.  If I'm looking at it right, do you turn that wrench on the back side of the toolpost, and that does something to the cutter placement on the opposite side of the toolpost to get your radius cut?


**Looking ahead to the trunion "saddle".  One of the fellas at work gave me a tutorial (a brief one) on the milling machine, then showed me a boring head into which I will chuch a boring bar.  This boring head has an adjustment that you turn to make the bit turn eccentric which I adjust how much off center to get my desired diameter cut.  Then plunging that down past the butt of the mortar taking a little off each time.  Is this the right direction I need to go?

Thanks in advance for all your insight and helpful directions.

Bryan


Offline GGaskill

  • Moderator
  • Trade Count: (2)
  • Senior Member
  • *****
  • Posts: 5668
  • Gender: Male
Re: Here goes Nothin (mortar project)
« Reply #13 on: May 08, 2007, 08:22:56 PM »
A boring head will work although you need to clamp the tube securely because of the interrupted cut.  What diameter trunnion are you going to use?  If it is a standard size (like 3/4"), you can use an end mill in a plunge cut and it will work better, in my opinion.
GG
“If you're not a liberal at 20, you have no heart; if you're not a conservative at 40, you have no brain.”
--Winston Churchill

Offline Cat Whisperer

  • Trade Count: (2)
  • Senior Member
  • *****
  • Posts: 7493
  • Gender: Male
  • Pulaski Coehorn Works
Re: Here goes Nothin (mortar project)
« Reply #14 on: May 09, 2007, 02:18:06 AM »
...
Thats a swell looking radius cutter, but it looks like its beyond my scope at this time.  If I'm looking at it right, do you turn that wrench on the back side of the toolpost, and that does something to the cutter placement on the opposite side of the toolpost to get your radius cut?
...
Bryan

There is a 1" shaft (top of pix to bottom of pix) that turns.  The cutter is held by the pieces welded together (top of pix).  There is a lever on shaft (bottom-middle of pix - black) that turns the shaft.  Crude (just a fiew pieces welded together), simple but it works.
If you go larger in radius you need two bearings - one on either side so the cutter is well supported.
Tim K                 www.GBOCANNONS.COM
Cat Whisperer
Chief of Smoke, Pulaski Coehorn Works & Winery
U.S.Army Retired
N 37.05224  W 80.78133 (front door +/- 15 feet)

Offline Mortarmer B

  • Trade Count: (0)
  • Member
  • *
  • Posts: 12
  • Gender: Male
Re: Here goes Nothin (mortar project)
« Reply #15 on: May 10, 2007, 08:18:38 AM »
I've finished the bore,  made the flip on the lathe, center drilled a hole for the live center to fit in and I've started to take the metal off the butt and define the radius.

I started with scrap material which was free and great.  But if I had to do it again I just would have bought some stock for this purpose.  My scrap is 5" diameter Stainless, it took me a little over an hour to turn off a little over an inch of material to get down to the final dimension.  Now that I've flipped it, I have to the same thing on the back 3".  I certainly would have spent the $ to get a properly sized piece of 1018 and a couple hours of my life back if I had to do it over again. 

A question on loads...I see that about 200 grains is the MAX load for a 1" bore (or powder chamber in the case of a sub-chambered piece.  Is there a danger from reduced loads?  I was just wondering if excessive air space in the powder chamber would cause a dangerous pressure spike with the powder first ignites.

Offline Double D

  • Trade Count: (3)
  • Senior Member
  • *****
  • Posts: 12609
  • SAMCC cannon by Brooks-USA
    • South African Miniature Cannon Club
Re: Here goes Nothin (mortar project)
« Reply #16 on: May 10, 2007, 08:34:01 AM »
Air space is not an issue in this large of an application.  An of course your powder will be slumped and not flat.

Offline Mortarmer B

  • Trade Count: (0)
  • Member
  • *
  • Posts: 12
  • Gender: Male
Re: Here goes Nothin (mortar project)
« Reply #17 on: May 24, 2007, 03:14:35 AM »
I couldn't stand it any longer...
I got the bore done, got ready to turn the stock in the chuck to radius the butt, and thought to myself, "This thing is just a vent hole away from being able to fire.  So I skipped steps c,d,e,f, and g and went straight to z.  I whipped out a make-shift firing cradle (see photo) and fired that puppy off.  I took me a few shots to even be able to see where the balls were going.  I could see the ball at the top of the arch, but then would lose it as it speed up on re-entry.  Firing was fun and all, but I can see why you all have so many projects, I already want MORE.  The stock I have is big enough for a soda pop can mortar.


Offline Mortarmer B

  • Trade Count: (0)
  • Member
  • *
  • Posts: 12
  • Gender: Male
Re: Here goes Nothin (mortar project)
« Reply #18 on: May 24, 2007, 03:17:33 AM »
Got the radius cut in steps,  It was no problem.  And smoothing those steps out with the grinder was easier than I thought it was going to be. 


Offline Mortarmer B

  • Trade Count: (0)
  • Member
  • *
  • Posts: 12
  • Gender: Male
Re: Here goes Nothin (mortar project)
« Reply #19 on: May 24, 2007, 03:24:44 AM »
Yesterday afternoon I finished the milling of the Trunnion saddle (did I make that up or is that really what it's called).  I used the boring head on the milling machine.  That head whirling around eccentric was a little intimidating, but I just took it slow and cut about .0150 at a pass.  I didn't go as deep with the saddle as the plans called for.  For some reason, that I haven't looked closely into yet, my dimensioning came out different, and if I cut the saddle to full depth I would have only had .5" or so between the powder chamber and the cut.  So I kept 1" between the cut and powder chamber and sacrificed a little on the appearance.  Today I hope to get one of the guys to help me drill and tap the 2 holes in the rear for the trunion mounting.


Offline jeeper1

  • Trade Count: (0)
  • A Real Regular
  • ****
  • Posts: 662
  • Gender: Male
Re: Here goes Nothin (mortar project)
« Reply #20 on: May 24, 2007, 04:57:54 AM »
Interesting looking test cradle.
And yes, cannons and mortars are very addicting. 
I've lost interest to a certain extent in regular firearms to pursue cannons, mortars and pyrotechnics.
I may not be completely sane, but at least I don't think I have the power to influence the weather.

Offline Mortarmer B

  • Trade Count: (0)
  • Member
  • *
  • Posts: 12
  • Gender: Male
Re: Here goes Nothin (mortar project)
« Reply #21 on: May 24, 2007, 05:56:26 AM »
Pyrotechnics!!!
Good deal.  I've wanted to get into that too, but I'm intimidated by the manufacturing of stars and ordering of the chemicals.


Offline Mortarmer B

  • Trade Count: (0)
  • Member
  • *
  • Posts: 12
  • Gender: Male
Re: Here goes Nothin (mortar project)
« Reply #22 on: October 03, 2008, 11:32:02 AM »


My Completed project...and certainly not my last.  Sorry it took so long to finish this post up, but got distracted by life and all.  This picture was taken last summer. 

Oh, if you look closely you can also see my beautiful daughter in the picture too. At that time she was about 10 months old.

Thanks so much for everyone that took the time to give me direction.  Thanks to CU for taking time to make his drawings available to the rest of us and to share them. 

Offline RocklockI

  • GBO Supporter
  • Trade Count: (1)
  • Senior Member
  • *****
  • Posts: 2747
  • Gender: Male
  • Morko and Me
Re: Here goes Nothin (mortar project)
« Reply #23 on: October 04, 2008, 06:13:52 AM »
That thing looks great . Cute kid too .
"I've seen too much not to stay in touch , With a world full of love and luck, I got a big suspicion 'bout ammunition I never forget to duck" J.B.

Offline Cat Whisperer

  • Trade Count: (2)
  • Senior Member
  • *****
  • Posts: 7493
  • Gender: Male
  • Pulaski Coehorn Works
Re: Here goes Nothin (mortar project)
« Reply #24 on: October 04, 2008, 01:47:35 PM »
...
Oh, if you look closely you can also see my beautiful daughter in the picture too. At that time she was about 10 months old.
...

Cool picture! My first memory is from when I was ONE year old.  You're starting her off right!

Tim K                 www.GBOCANNONS.COM
Cat Whisperer
Chief of Smoke, Pulaski Coehorn Works & Winery
U.S.Army Retired
N 37.05224  W 80.78133 (front door +/- 15 feet)

Offline Div Arty

  • Trade Count: (0)
  • Avid Poster
  • **
  • Posts: 106
Re: Here goes Nothin (mortar project)
« Reply #25 on: October 04, 2008, 05:54:37 PM »

That has to be the poster girl for the 2009 calendar.

Offline Terry C.

  • Trade Count: (0)
  • Senior Member
  • *****
  • Posts: 1215
  • Gender: Male
  • I see what you did there...
Re: Here goes Nothin (mortar project)
« Reply #26 on: October 04, 2008, 06:58:31 PM »
A fine mortar and excellent pic!

So, what's next?

Offline MikeR C

  • Trade Count: (0)
  • Avid Poster
  • **
  • Posts: 178
  • Gender: Male
Re: Here goes Nothin (mortar project)
« Reply #27 on: October 07, 2008, 10:59:24 AM »
Congratulations! Nothing beats lighting the fuse on a just finished cannon!

If you look here:
http://www.gboreloaded.com/forums/index.php/topic,135908.msg1098522201.html#msg1098522201

You'll see that I did my barrel pretty much the same as yours, boring, live center, boring bar for saddle, smooth sides tho.

Congrats again,
Mike