Tim, we finished the truck repairs just before the snow storm hit. Lucked out!!
The photos below give you a rough idea of all the work that had to be finished BEFORE we could proceed on machining and hand fitting the parts which make up the Trunnion-Band Assembly which includes the Trunnion-Band, the Yokes (2), the Wedges (2), the Dovetail Keys (4), and the Breech Strap. The reason that the order in which operations were accomplished was so important, is because once certain things are done, you can't go back and do other things because destructive dissassembly would have to precede your current op. An example is the reason for polishing the tube in the trunnion and breech areas. You can't go back and do this after the Dovetail Keys (4) are fitted and installed. You would be forced to drill and tap all four keys and remove them whith a slide-hammer to take the Trunnion-Band Assembly apart, which would destroy those, labor-intensive Dovetail Keys.
The basic plan is this: 1. Do all machining and polishing in areas not accessible after installation of Trunnion-Band Assembly.
2. Do all polishing of the Assembly's parts.
3. Mill slots in the Yokes and then file 75 deg. dovetails (female).
4. Machine slots and file 75 deg. dovetails (female) in the Breech Strap.
5. Make and heat-treat the 2.5 deg. Wedges.
6. Dry fit all parts to check proper fit of each. Calculate the length of each end of the Wedge so that it can be driven downward .25", after heating, e and have equal amounts protruding from the top and bottom of the Yoke.
7. Apply torch to expand the length of the Breech Strap ends.
8. When gap between ends and trunnion surface gets down to .010" from .020", drive Wedges to take out all looseness.
9. After the Straps have cooled, vigorously shake the trunnions to see if the entire assembly is in a state of Tension.
10. Check to see if the dovetails in the Yokes and the Breech Straps now line up. Re-do processes 6 through 9 if they DO NOT LINE UP.
Regards,
Tracy and Mike
This Trunnion-Band Assembly line drawing shows the relative size and position of all assembly parts. The Red-dashed line represents the 2.5 deg. front edge of the Wedge slot in the Breech Strap which the force applying edge of the Wedge pushes against as it is driven downward. The Blue-dashed line represents the back edge of the Wedge slots in the Yoke which stop rearward movement of the driven Wedge.

Here all parts are dry fitted with no looseness to transfer dovetail position from the Yoke to the Breech Strap. Lines are scribed into the marker blackened area on the Breech Strap ends.

Each trunnion's length must be milled to proper 1/6 scale length now.

Since the in-process centers were milled off during the trunnion shortening operation, correct, 1/6 scale size centers had to be lathe-drilled at this time.

This machinist's clamp was installed during the dry fitting process and a drill point is used to mark the Yoke's front relief edge on the Strap from which calculations bring a 2.5 deg. slant drilling start point to light on the top edge of the Breech Strap end.

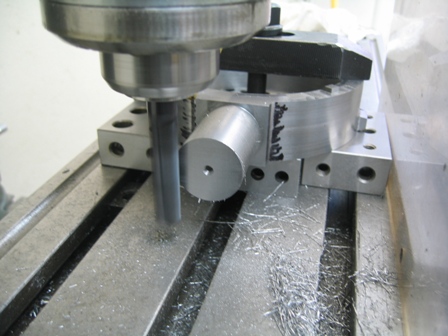
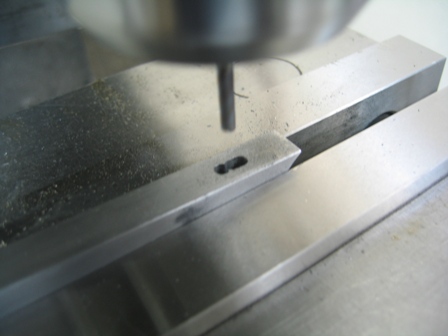
Next an endmill removes waste from the Wedge slot, taking care not to actually touch the forward or rearward edges of the slot. These areas are finished with needle files.

The 2.5 deg., 0-1 tool steel, Wedge is hardened in a propane torch flame by heating it to a bright cherry red color, (in subdued light), and then quenching it in vegetable oil which works great and does not stink like burned motor oil does.

The hardened Wedge can be checked for hardness with an old file. Give the end of the Wedge a lick; the file should skate right off without cutting any filings. Now the Wedge is ready for tempering or "drawing back" to reduce it's hardness a bit to about 51-54 Rc and to make it much tougher so it can resist cracking when driven by hammer blows. We use a small electric furnace, (Ebay purchased), with 2,200 F. capability. 675 deg, F. for 1 hour, with open door cooling, works well to achieve a tough, non-deforming Wedge.

This photo shows the milling of the center of the Breech Strap dovetail slots with a .010" offset towards the breech end of the Strap. Hopefully the dovetail slots in the Yokes and the Strap ends will line up after heat expansion, Wedge driving, and then cooling so custom made double-dovetail keys can be inserted to keep the Yoke extensions in place during recoil.

Our 75 deg. dovetail milling cutter still did not arrive, so more hand filed dovetails are in order. First, you make a special dovetail file with one "safe" edge by taking a regular triangular file and grinding off the teeth on one side so that it and one other side form a 75 deg. angle. In use, put the safe side down in your square milled notch and square up the file with the front and the top edge of the Strap. File slowly with straight ahead arm movements. Do 5 or 6 practice pieces before you do one that MUST be correct like these 4 must be.

Do you see how square the file is to the side of the Breech Strap? It must be kept in this attitude all the way through the stroke or your dovetail surfaces will have taper.

In-process inspection with an eye loupe is essential so minor variations can be corrected before they get too big and ruin the job.

The next few photos, shown in about a week, will describe the making and the fitting of those male dovetail inserts. More, high stress, hand filing! Gotta love it!!