Author Topic: The Making of a Full Scale Limber Chest  (Read 7106 times)

0 Members and 4 Guests are viewing this topic.

Offline Zulu

  • Trade Count: (0)
  • Senior Member
  • *****
  • Posts: 2477
  • Honor is a gift a man gives himself.
    • Wood & Ironworks
The Making of a Full Scale Limber Chest
« on: October 07, 2012, 02:38:58 AM »
I decided to plunge into my next limber chest build.  This will be my fifth build. 
I also decided to photo document this one.  I will post it here for your viewing pleasure. :)
It will be built to specifications from "Antique Ordnance Publishers" drawings.
When finished, it will be posted on my website for sale.
This is a work in progress and will take a while to complete.  I am logging my work hours so I can see how long it takes me to build one.
Here is what I have so far.
Zulu
 
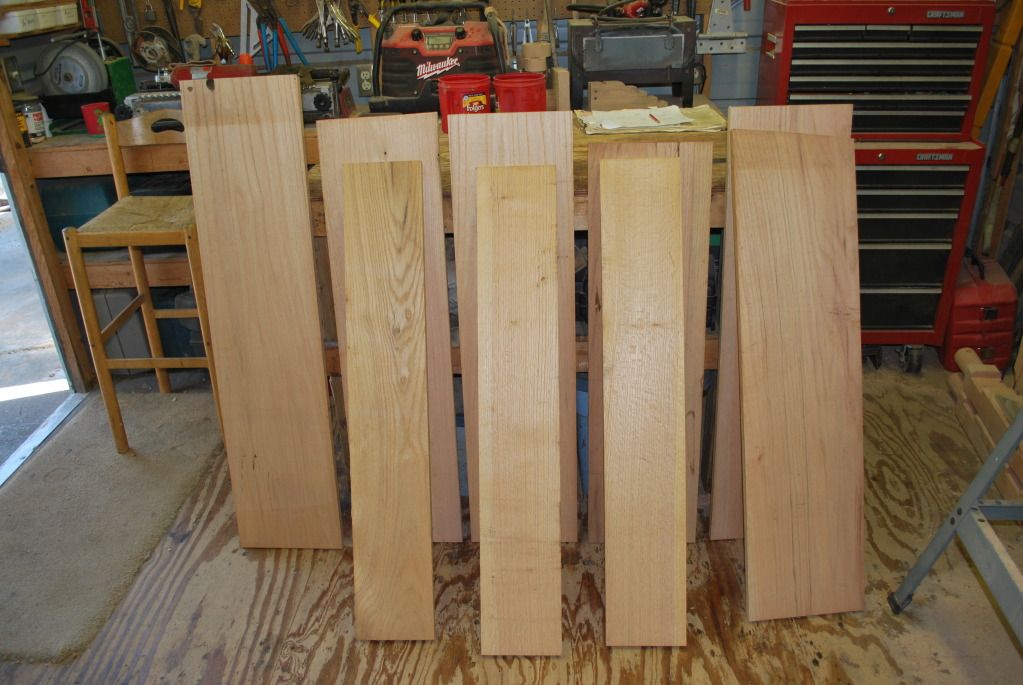
Rough cut all the wood to prepare for glueing.

 
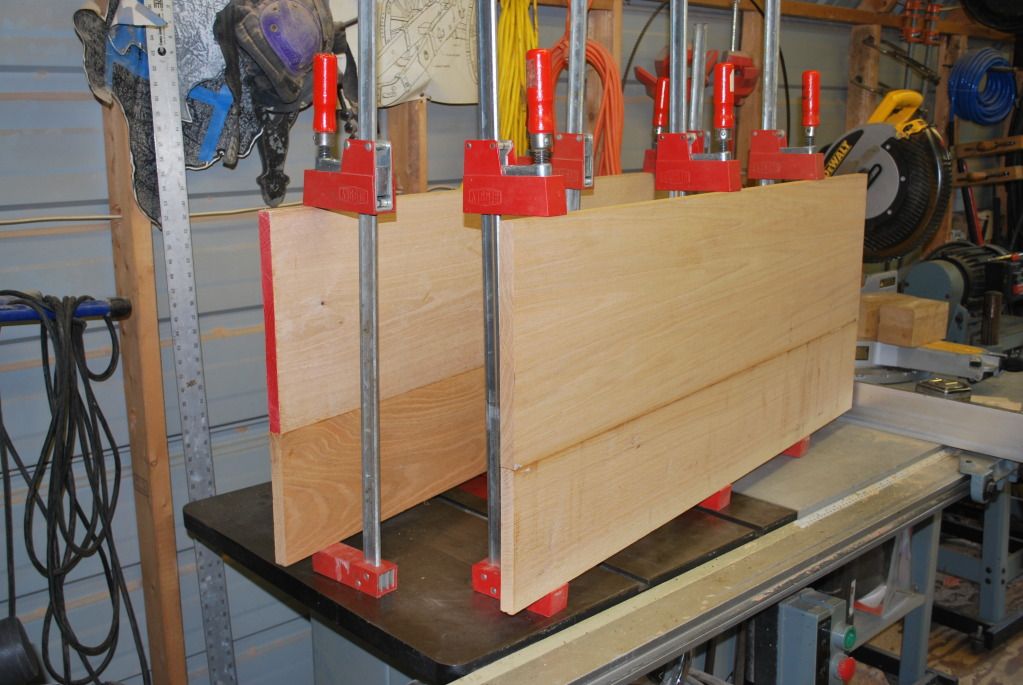
Bisquit join and glue, front, back, sides and bottom panels.

 
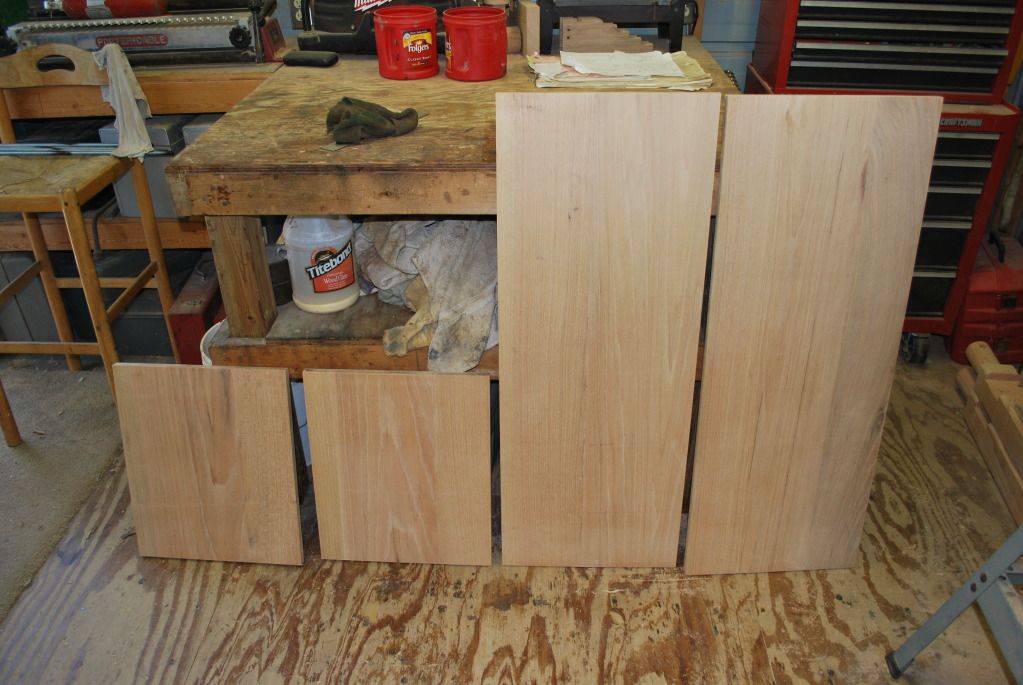
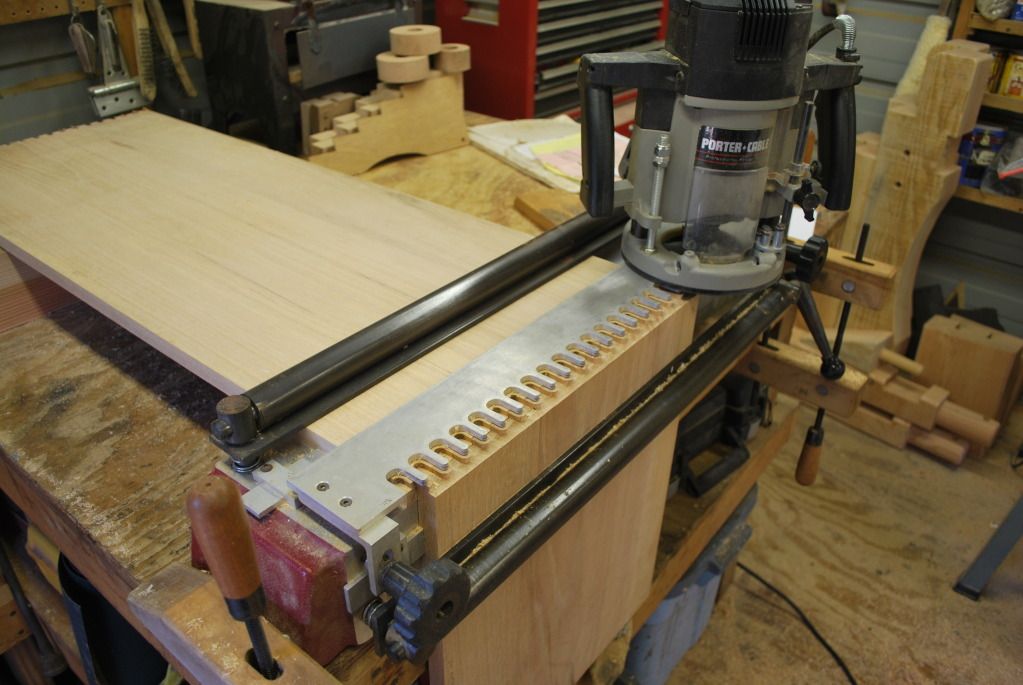
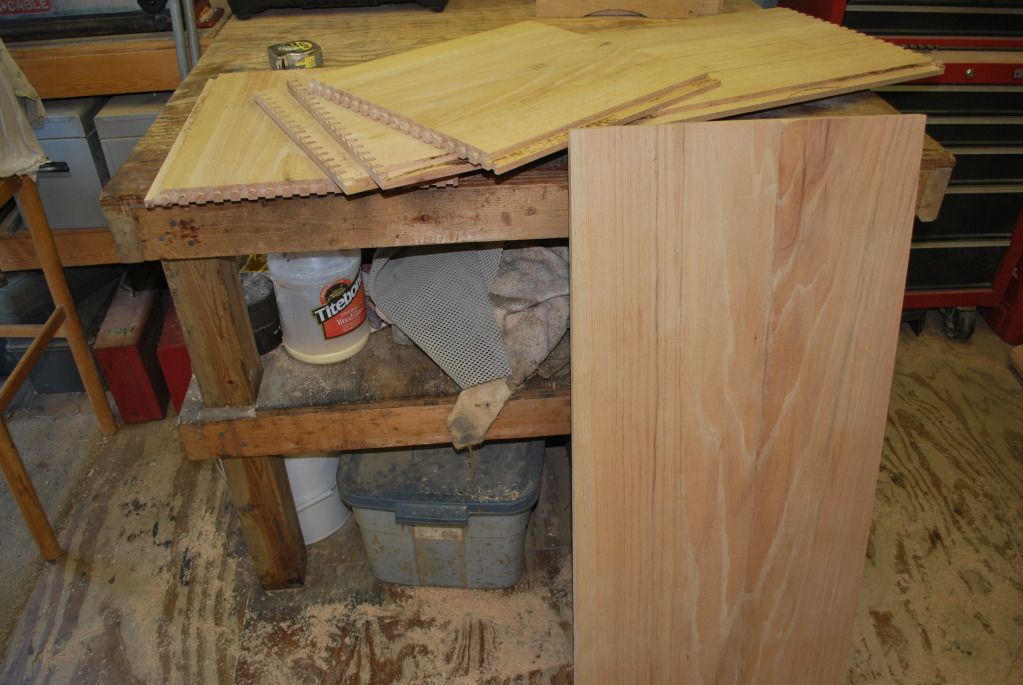
Cut to final size. and start dovetail process.


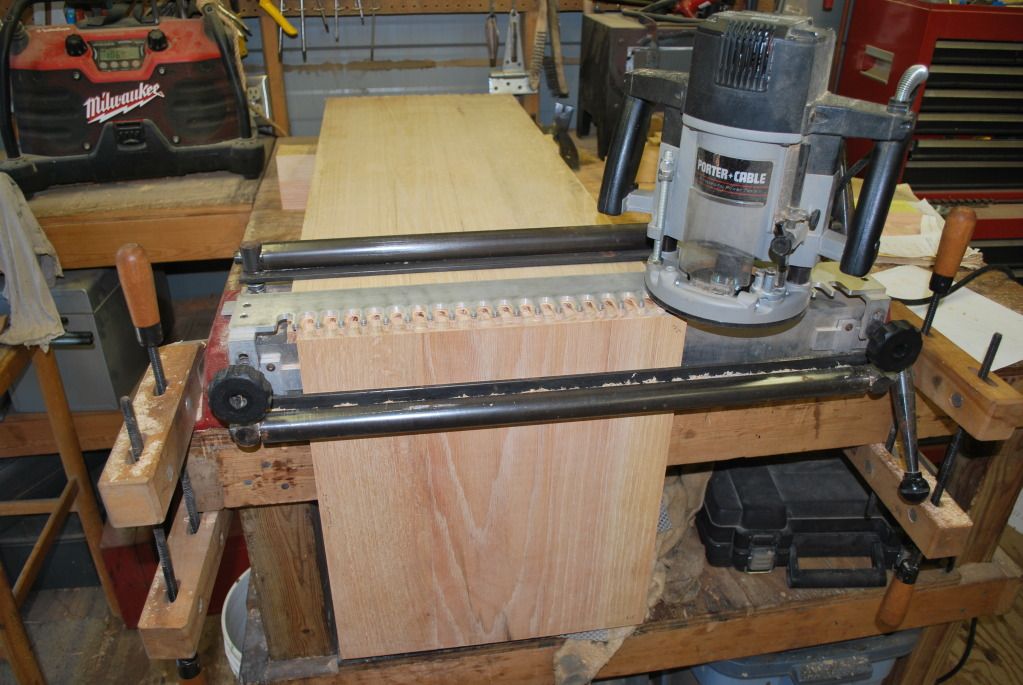
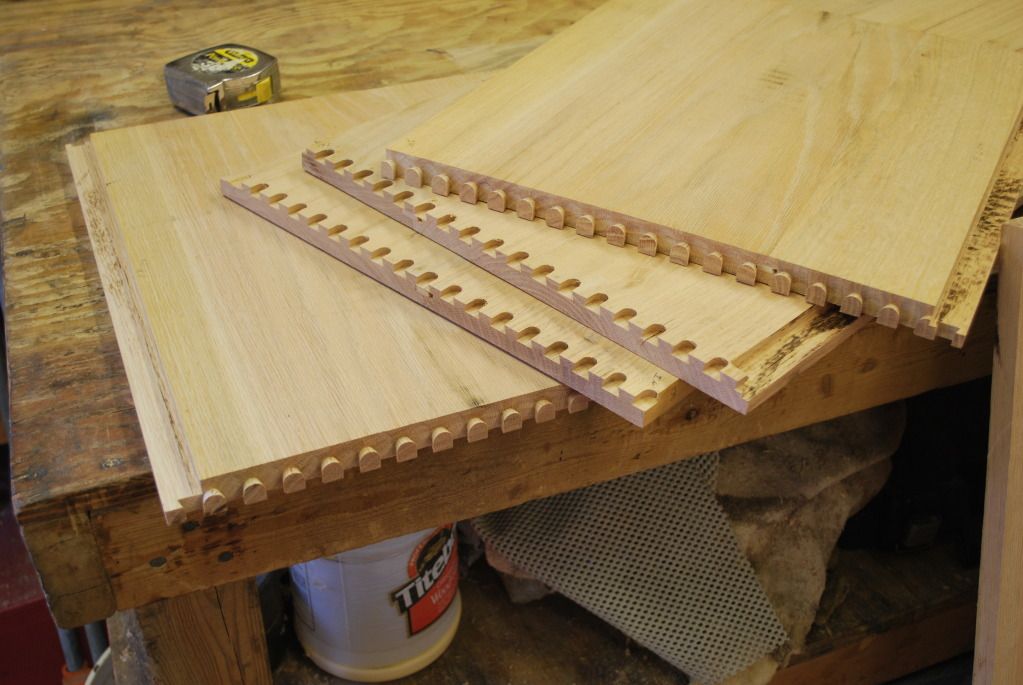
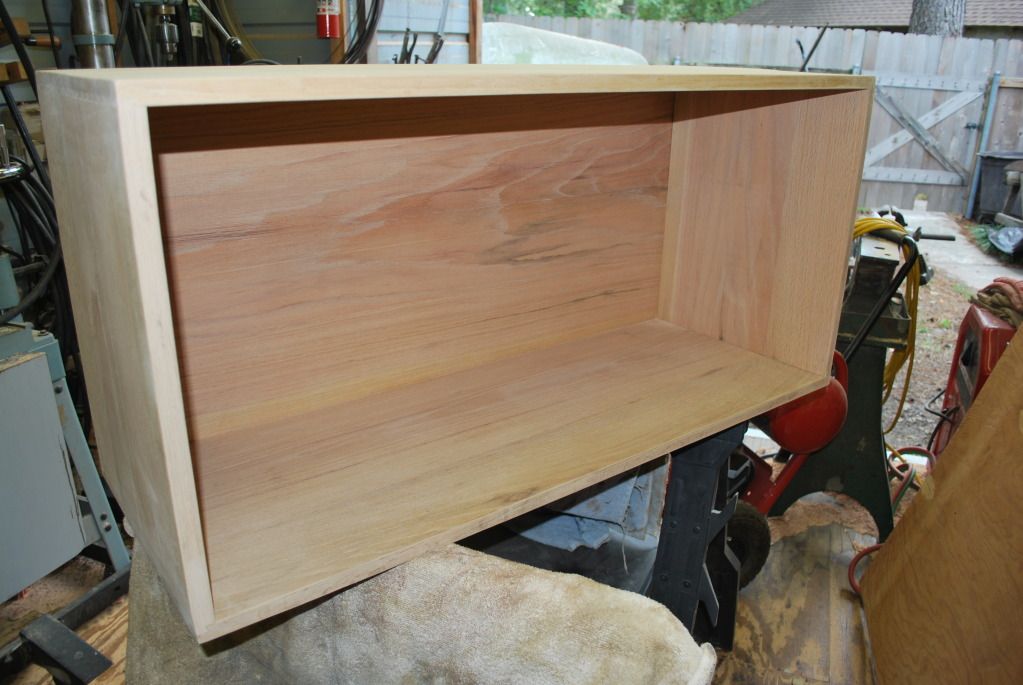
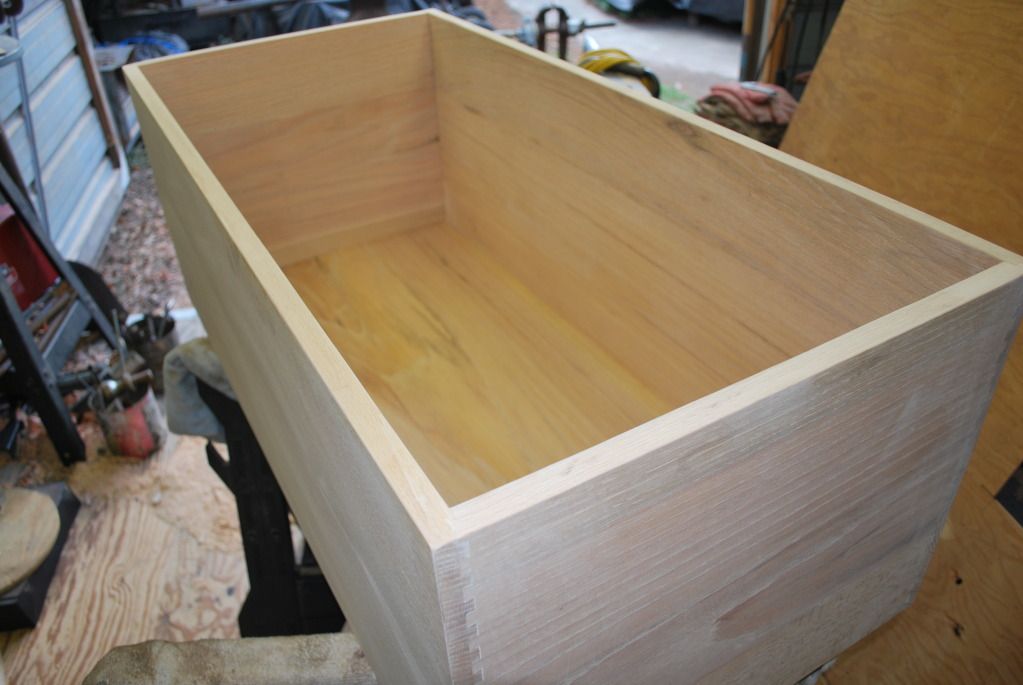
Finished dovetails and bottom panel.
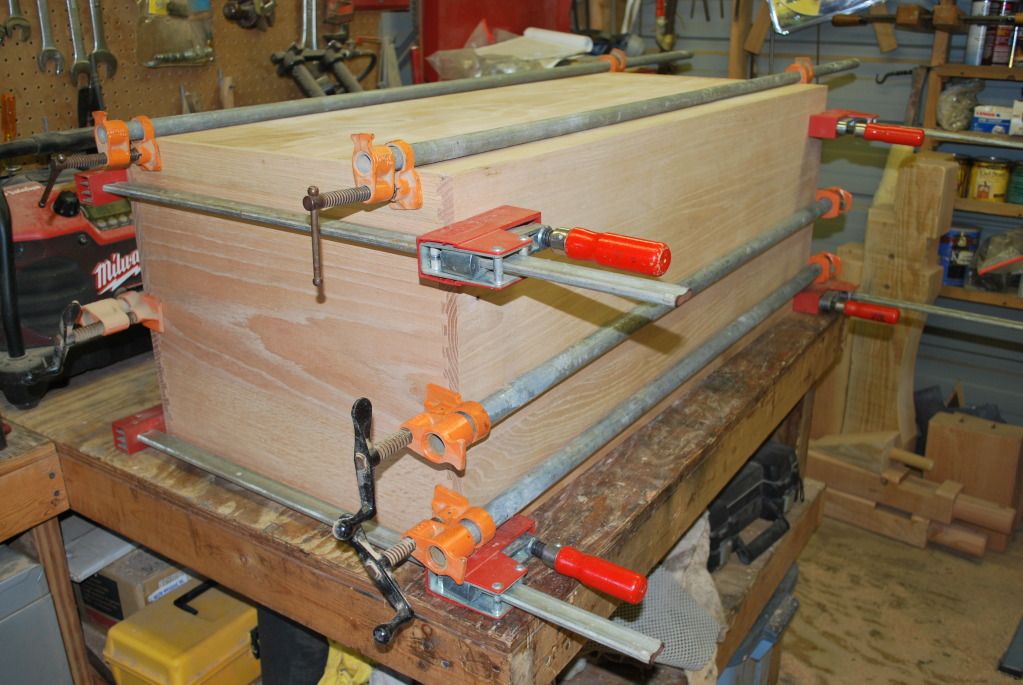
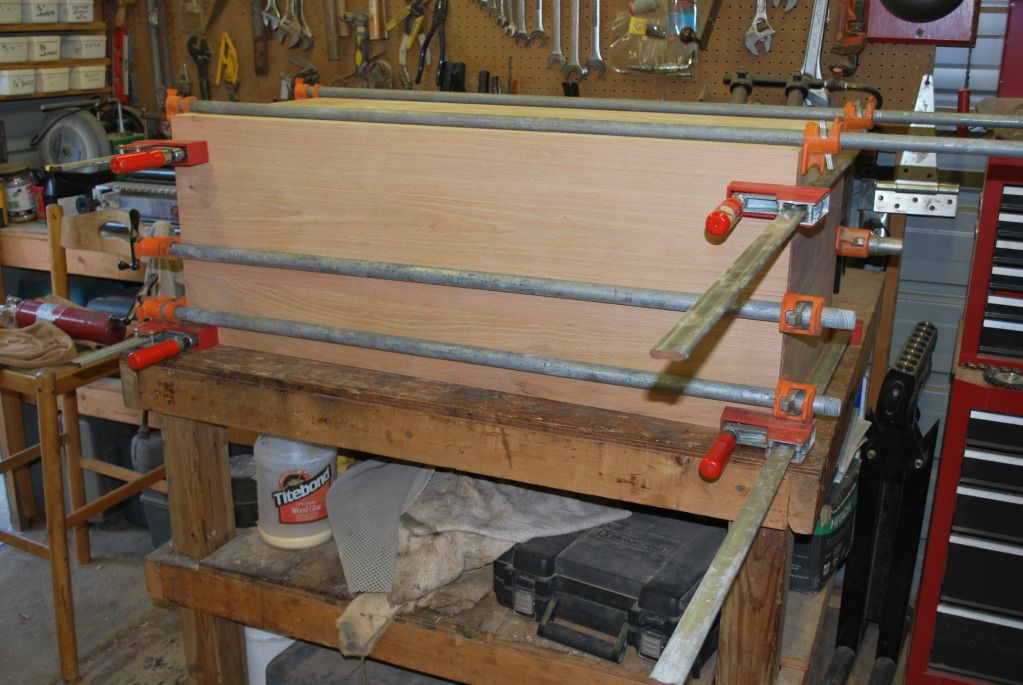

Glue up of box.


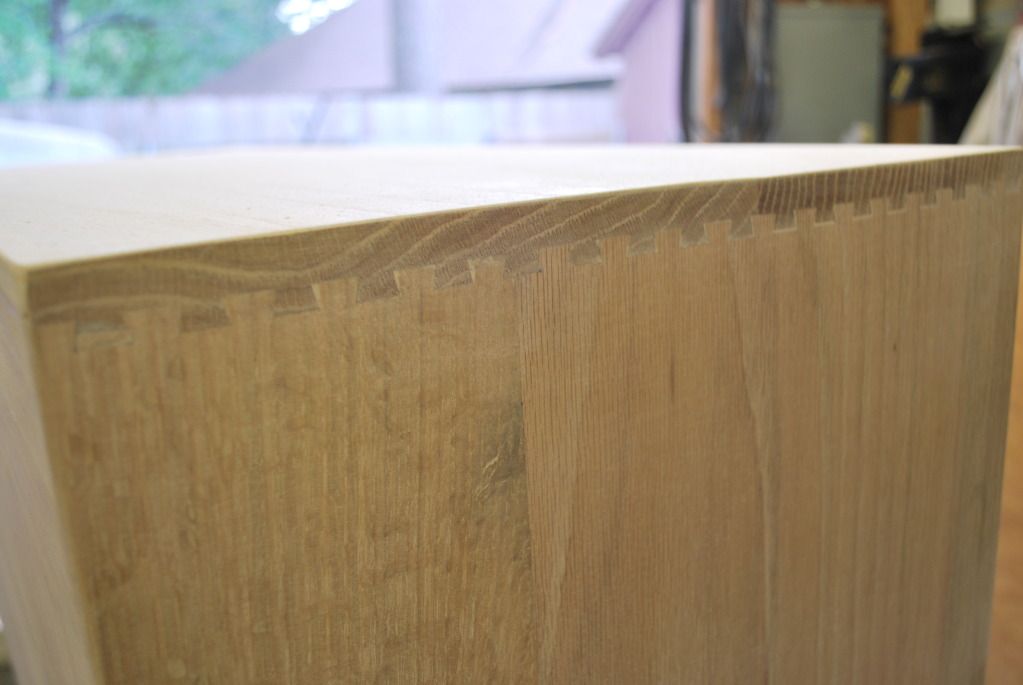
Note the fit on the dovetails.

 
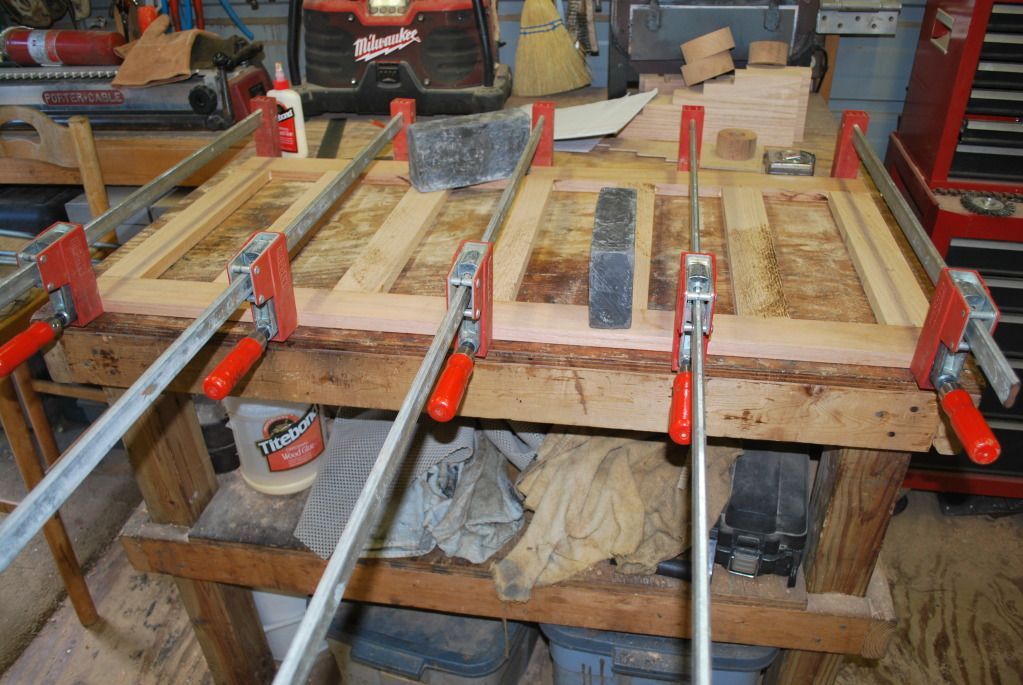
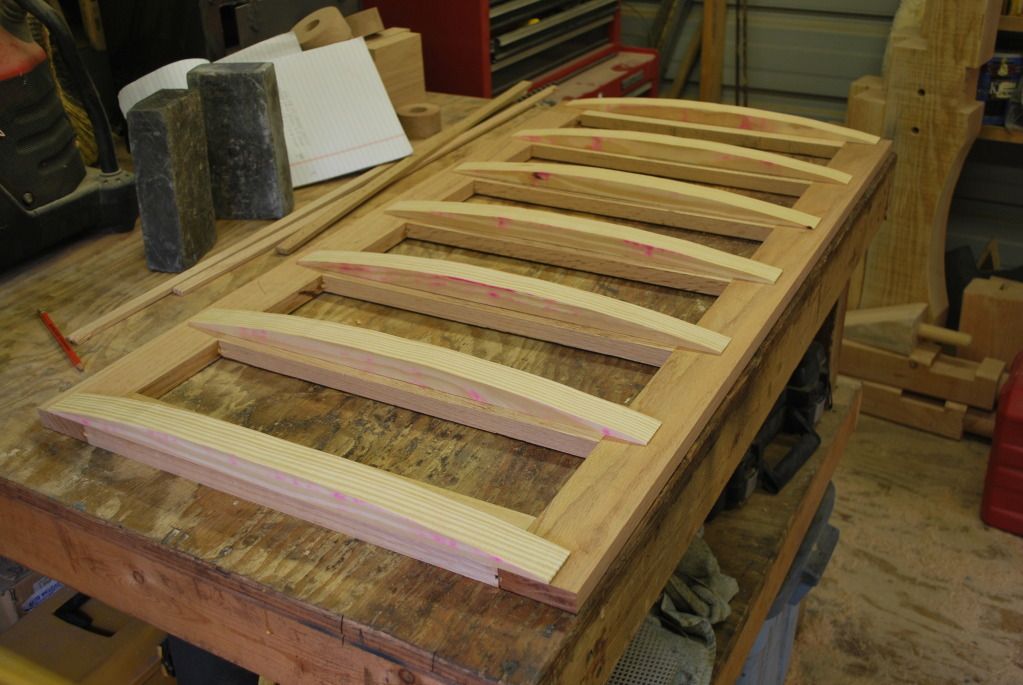
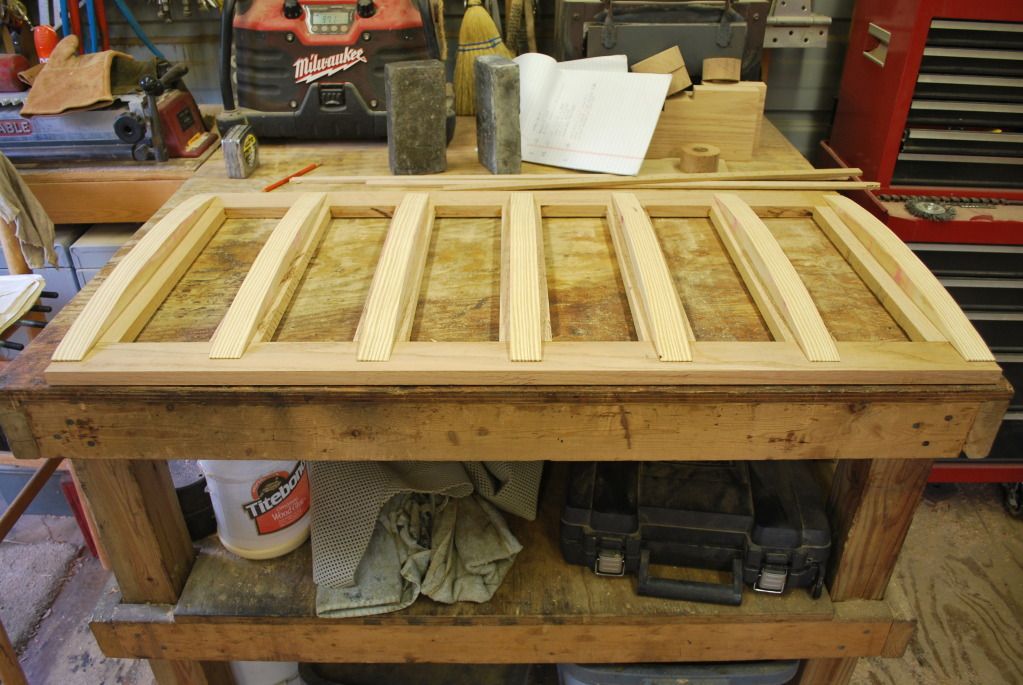
Glue up of lid.  The curved ribs on  will allow the copper top to shed water.  They will be covered with 1/4" plywood, then the copper top will be installed later.


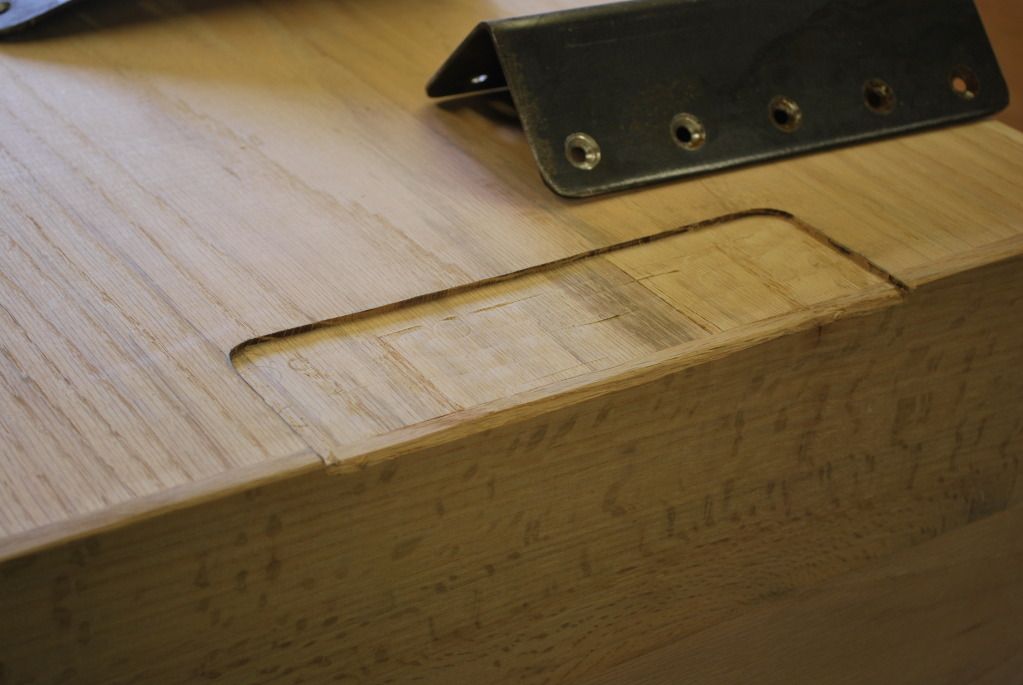
Insetting the reinforcing angles into the bottom.  The last time I built a chest, I made double the amount of bottom and corner angles that I needed.  So I had these already in stock.


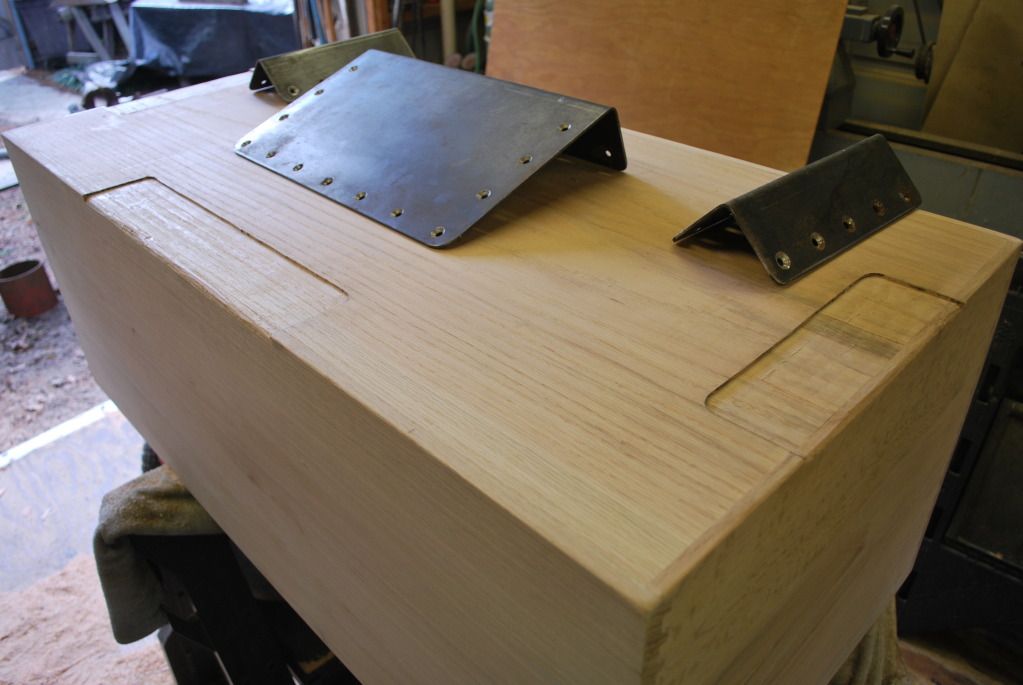
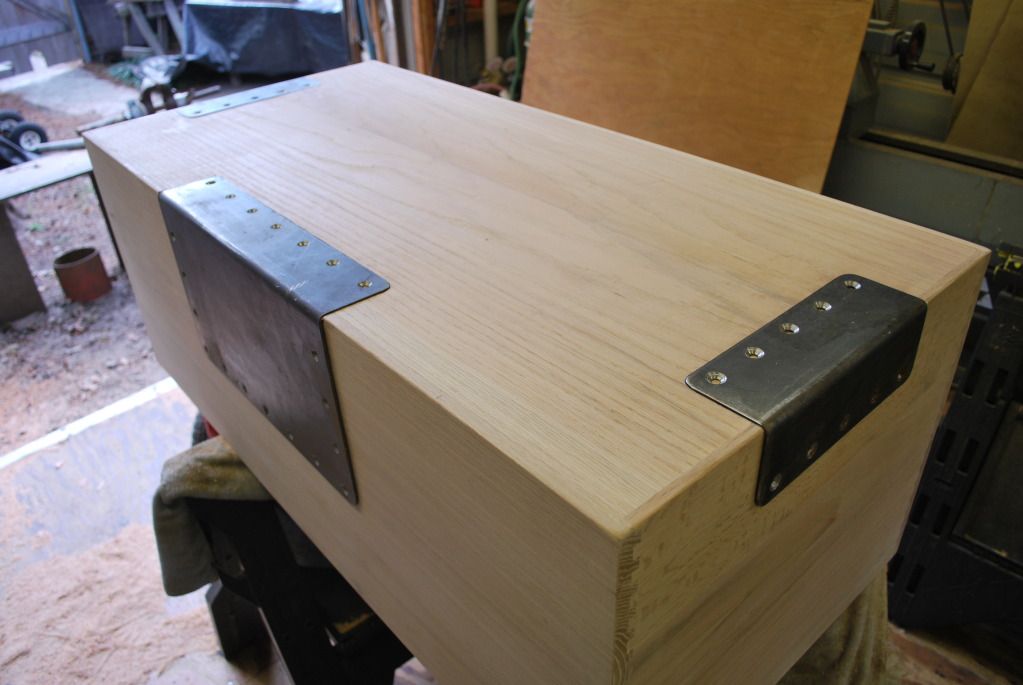
Next, I will start on metal work.  It is time consuming.  I will take pictures and continue this post as I progress.
I have always enjoyed the project build pictures that others post.  I hope you enjoy these.
You can see more pictures of other limber chests I have built here on my website.
http://www.jmelledge.com/PortfolioLimberChest.html
Zulu
Zulu's website
www.jmelledge.com

Offline Artilleryman

  • Moderator
  • Trade Count: (0)
  • Senior Member
  • *****
  • Posts: 1378
Re: The Making of a Full Scale Limber Chest
« Reply #1 on: October 07, 2012, 05:28:20 AM »
Looks great!
Norm Gibson, 1st SC Vol., ACWSA

Offline oltom

  • Trade Count: (0)
  • Avid Poster
  • **
  • Posts: 135
  • Gender: Male
Re: The Making of a Full Scale Limber Chest
« Reply #2 on: October 07, 2012, 05:40:56 AM »
aahhh.......I wish I lived next door to you!.....but MY wife would gripe about the time I could spend in your shop!!!!!!!!!!

that dovetail jig is to die for!!!!!!!!!!1


ahhhh......to many projects~not enuff time!
"MORE booze!"

Offline Frank46

  • Trade Count: (0)
  • A Real Regular
  • ****
  • Posts: 707
Re: The Making of a Full Scale Limber Chest
« Reply #3 on: October 07, 2012, 05:27:13 PM »
Zulu, as one who couldn't cut a straight line in wood I have to say your joinery is first rate. This is coming from someone's idea of a box is eight pieces of wood nailed together. Frank

Offline A.Roads

  • GBO Supporter
  • Trade Count: (0)
  • Avid Poster
  • *****
  • Posts: 182
  • Gender: Male
Re: The Making of a Full Scale Limber Chest
« Reply #4 on: October 07, 2012, 08:56:02 PM »
This is coming from someone's idea of a box is eight pieces of wood nailed together
 
I suspect an eight sided box has many of us scratching our heads.

Offline Double D

  • Trade Count: (3)
  • Senior Member
  • *****
  • Posts: 12608
  • SAMCC cannon by Brooks-USA
    • South African Miniature Cannon Club
Re: The Making of a Full Scale Limber Chest
« Reply #5 on: October 08, 2012, 03:05:10 AM »
This is coming from someone's idea of a box is eight pieces of wood nailed together
 
I suspect an eight sided box has many of us scratching our heads.


I think that is the image he trying to present....

Offline onegreatshot

  • keep their heads down til help arrives
  • Trade Count: (2)
  • Avid Poster
  • **
  • Posts: 171
  • Gender: Male
  • Proud owner of 3 brooks USA cannons, look'g 4 more
Re: The Making of a Full Scale Limber Chest
« Reply #6 on: October 08, 2012, 09:25:12 AM »
Z after looking at your work on the limber, Norm Abrams of the New Yankee workshop has nothing on you. He of course has a crew who cleans his shop as the work progresses.

Offline skratch

  • Trade Count: (0)
  • Member
  • *
  • Posts: 72
  • Gender: Male
Re: The Making of a Full Scale Limber Chest
« Reply #7 on: October 08, 2012, 09:39:37 AM »
Eight sided box,,, six sides plus inside and outside   ;D   ;)

Offline Zulu

  • Trade Count: (0)
  • Senior Member
  • *****
  • Posts: 2477
  • Honor is a gift a man gives himself.
    • Wood & Ironworks
Re: The Making of a Full Scale Limber Chest
« Reply #8 on: October 08, 2012, 10:07:01 AM »
Z after looking at your work on the limber, Norm Abrams of the New Yankee workshop has nothing on you. He of course has a crew who cleans his shop as the work progresses.

When I clean, I just open the doube doors on one end of the shop and blow all the sawdust out with a leaf blower. :o
Zulu
Zulu's website
www.jmelledge.com

Offline The Jeff

  • Trade Count: (0)
  • Contributor
  • ***
  • Posts: 255
Re: The Making of a Full Scale Limber Chest
« Reply #9 on: October 08, 2012, 11:14:22 AM »
When I clean, I just open the doube doors on one end of the shop and blow all the sawdust out with a leaf blower. :o
Zulu


Now that's the way to do it! I do the same thing after sanding sheet rock.


Thanks for the build thread, I love reading them as well.

Offline GGaskill

  • Moderator
  • Trade Count: (2)
  • Senior Member
  • *****
  • Posts: 5668
  • Gender: Male
Re: The Making of a Full Scale Limber Chest
« Reply #10 on: October 08, 2012, 01:32:50 PM »
So how many hours so far (unless that is proprietary information)?
GG
“If you're not a liberal at 20, you have no heart; if you're not a conservative at 40, you have no brain.”
--Winston Churchill

Offline Zulu

  • Trade Count: (0)
  • Senior Member
  • *****
  • Posts: 2477
  • Honor is a gift a man gives himself.
    • Wood & Ironworks
Re: The Making of a Full Scale Limber Chest
« Reply #11 on: October 08, 2012, 04:19:58 PM »
So how many hours so far (unless that is proprietary information)?

George,
At this point I had 21 hours in it.  Keep in mind that this is my 5th limber chest.  I know my drawings inside and out.  Any one who has done a big project knows how much thinking time goes into it.  My thinking time on this is minimal.  I know what to do.
I am several hours into the metal work now.  I will try to post some pictures tomorrow but they are just cutting and center punching in preporation for drilling at this point.
Zulu
Zulu's website
www.jmelledge.com

Offline Zulu

  • Trade Count: (0)
  • Senior Member
  • *****
  • Posts: 2477
  • Honor is a gift a man gives himself.
    • Wood & Ironworks
Re: The Making of a Full Scale Limber Chest
« Reply #12 on: October 09, 2012, 03:24:46 AM »
Here are some more pictures.
A lot of 3/8" X 1 1/2" flat bar, cut to size and centerpunched for drilling.  These pieces are for the hinges, front stays, and back stay.


These are the reinforcing angles for the corners and bottom.  I drilled and countersunk them for screws when I built my last chest so I had them prepared already.


Miscellaneous parts that will be something when I'm finished. ;)

Preparing to start drilling.  To be followed by countersinking.  A lot of holes to drill today.

 
According to the drawings, the front and rear stays, as well as the hinges and handle plates are to have a hammered in taper from 1/2" to 1/4" lengthwise. :o :o
I have never done that.  I use 3/8" flat strap on everything.  I know it is not historically accurate but if anyone out there has ever tried drawing out a 1/2" X 1 1/2" flat bar to 1/4" over 18" long, you will know why I'm doing it this way. :P
Enjoy the pics.
Zulu


Zulu's website
www.jmelledge.com

Offline The Jeff

  • Trade Count: (0)
  • Contributor
  • ***
  • Posts: 255
Re: The Making of a Full Scale Limber Chest
« Reply #13 on: October 09, 2012, 12:52:44 PM »
Have you considered making a CAD drawing of your parts and have someone with a water jet cutter cut them out? At my work we get a lot of stuff similar to yours cut out and bent. All we have to do is countersink the holes.

Offline onegreatshot

  • keep their heads down til help arrives
  • Trade Count: (2)
  • Avid Poster
  • **
  • Posts: 171
  • Gender: Male
  • Proud owner of 3 brooks USA cannons, look'g 4 more
Re: The Making of a Full Scale Limber Chest
« Reply #14 on: October 09, 2012, 01:33:35 PM »
Keep them coming. This is very interesting.

Offline Zulu

  • Trade Count: (0)
  • Senior Member
  • *****
  • Posts: 2477
  • Honor is a gift a man gives himself.
    • Wood & Ironworks
Re: The Making of a Full Scale Limber Chest
« Reply #15 on: October 09, 2012, 03:00:42 PM »
Have you considered making a CAD drawing of your parts and have someone with a water jet cutter cut them out? At my work we get a lot of stuff similar to yours cut out and bent. All we have to do is countersink the holes.

Jeff,
No, I have not considered that.  I really don't have that hard of a time making the stuff myself.  It just takes time.
Zulu
Zulu's website
www.jmelledge.com

Offline oltom

  • Trade Count: (0)
  • Avid Poster
  • **
  • Posts: 135
  • Gender: Male
Re: The Making of a Full Scale Limber Chest
« Reply #16 on: October 09, 2012, 03:15:20 PM »
"I have never done that.  I use 3/8" flat strap on everything.  I know it is not historically accurate but if anyone out there has ever tried drawing out a 1/2" X 1 1/2" flat bar to 1/4" over 18" long, you will know why I'm doing it this way." :P

FIRE UP THE BAR_B_QUE!!!!!!!!

I keep thinking I will use the friends metal forge to make a tommahawk outta a rail spike.......... ??? :o

'someday' projects!!!!!!!!!
"MORE booze!"

Offline Zulu

  • Trade Count: (0)
  • Senior Member
  • *****
  • Posts: 2477
  • Honor is a gift a man gives himself.
    • Wood & Ironworks
Re: The Making of a Full Scale Limber Chest
« Reply #17 on: October 09, 2012, 03:49:03 PM »
Got some more stuff done today.
Drilled 51 holes and countersunk them.

 
Started on handles with 3/4" round bar.


This is what happens when you try to take a picture and use a torch atthe same time. :-[ :-[ :-[ :-[ :-[ :-[ :-[

 
Pardon the vise.  The screw stripped out and I had to jerry rig it with a scaffold leveling screw to make it work. :P :P


Still doing more metal work.  I have to grind everything nice and get it ready for welding.
Tomorrow I weld. ;D
Zulu


Zulu's website
www.jmelledge.com

Offline NinjaToes

  • Trade Count: (0)
  • Member
  • *
  • Posts: 72
  • Gender: Male
Re: The Making of a Full Scale Limber Chest
« Reply #18 on: October 09, 2012, 03:59:21 PM »
Very nice work Zulu  8)
Some people are like a Slinky...

Not really good for anything, but they still bring a smile to your face when you push them down a flight of stairs.

Offline Artilleryman

  • Moderator
  • Trade Count: (0)
  • Senior Member
  • *****
  • Posts: 1378
Re: The Making of a Full Scale Limber Chest
« Reply #19 on: October 09, 2012, 04:16:43 PM »
I have machined the taper into the straps.  It takes some time but that works better for me than trying to forge them into shape. 
Norm Gibson, 1st SC Vol., ACWSA

Offline flagman1776

  • GBO Supporter
  • Trade Count: (3)
  • A Real Regular
  • *****
  • Posts: 795
  • Gender: Male
Re: The Making of a Full Scale Limber Chest
« Reply #20 on: October 09, 2012, 04:23:36 PM »
I wouldn't want to pay my village blacksmith to hand forge them.  I imagine the originals were forged with a water powered trip hammer.  Yes, I could see a milling set up to plane the taper. 

Offline Zulu

  • Trade Count: (0)
  • Senior Member
  • *****
  • Posts: 2477
  • Honor is a gift a man gives himself.
    • Wood & Ironworks
Re: The Making of a Full Scale Limber Chest
« Reply #21 on: October 10, 2012, 02:50:26 AM »
Most current manufacturers use cast ironwork in carriages and limbers.
A set of cast limber chest irons cost almost $800. :o :o
Forged is better than cast in my opinion.
Zulu
Zulu's website
www.jmelledge.com

Offline texas arty

  • Trade Count: (0)
  • Member
  • *
  • Posts: 8
Re: The Making of a Full Scale Limber Chest
« Reply #22 on: October 10, 2012, 07:16:17 AM »
I am interested in how you make the hasp and locking pin. Hope you can post some pictures.

Offline Zulu

  • Trade Count: (0)
  • Senior Member
  • *****
  • Posts: 2477
  • Honor is a gift a man gives himself.
    • Wood & Ironworks
Re: The Making of a Full Scale Limber Chest
« Reply #23 on: October 10, 2012, 12:24:50 PM »
I am interested in how you make the hasp and locking pin. Hope you can post some pictures.

texas arty,
I will be posting pictures when I get there.
Are you making a limber chest? 
Zulu
Zulu's website
www.jmelledge.com

Offline Zulu

  • Trade Count: (0)
  • Senior Member
  • *****
  • Posts: 2477
  • Honor is a gift a man gives himself.
    • Wood & Ironworks
Re: The Making of a Full Scale Limber Chest
« Reply #24 on: October 10, 2012, 04:03:56 PM »
Here is what I got done today.
Hinges, handles, front and rear stays, ready for welding.


Handles and stays welded.

 
Inseting hinges in the lid and stays in the bottom of the chest.


When installing the front stays, it is imperative that you make the center to center spread 35.05".  There is no point in going through all this trouble and making a limber chest that won't fit on a properly made limber.  Even if making a limber in the future is not in your plans, you may find yourself in the position that you want to sell the chest.  It will go a long way with a buyer if it will fit on a limber.  Of course the limber will have to be properly
 made. :P :P :P


the top in place.

 
the welded hinges.


There is still a lot to do.
The hinges run vertically down the side of the box.  I need to cut them to final length and weld a 3" tab at 90 degrees that will be inset into the bottom.
The metal work is almost all done and is ready for final clean up.  I still have to make the front lock hasp and the hinge that goes with it.
I'm ready to put the 1/4" plywood on the top ribs.
I will post more pictures when I get more done.  The best part is yet to come.  That is the installation of the copper top.  It takes about 200 copper nails. :o :o :o 8)
Hope you enjoyed the pictures.
Zulu


Zulu's website
www.jmelledge.com

Offline skratch

  • Trade Count: (0)
  • Member
  • *
  • Posts: 72
  • Gender: Male
Re: The Making of a Full Scale Limber Chest
« Reply #25 on: October 10, 2012, 05:24:55 PM »
Zulu, thanks much for the work in progress thread, your excellent pictures show metal set-ups I wouldn't have thought of.


skratch,,,,,,


Offline Artilleryman

  • Moderator
  • Trade Count: (0)
  • Senior Member
  • *****
  • Posts: 1378
Re: The Making of a Full Scale Limber Chest
« Reply #26 on: October 11, 2012, 05:00:31 AM »
Great set of how to photos.
Norm Gibson, 1st SC Vol., ACWSA

Offline Cannoneer

  • GBO Supporter
  • Trade Count: (0)
  • Senior Member
  • *****
  • Posts: 3950
Re: The Making of a Full Scale Limber Chest
« Reply #27 on: October 11, 2012, 06:05:08 AM »
Z after looking at your work on the limber, Norm Abrams of the New Yankee workshop has nothing on you. He of course has a crew who cleans his shop as the work progresses.

Hey, forget about the clown-time "Pawn Stars", this gives me a grand idea.


Ok Zulu, prepare yourself and sit down, so that the added weight to your head doesn't topple you over: Superb build thread, displaying a stellar command of craft!

This question just popped into my head: Which would be more difficult to produce (or no difference); true scale like you're doing, or reduced scale (let's say ¼)? 

RIP John. While on vacation July 4th 2013 in northern Wisconsin, he was ATVing with family and pulled ahead of everyone and took off at break-neck speed without a helmet. He lost control.....hit a tree....and the tree won.  He died instantly.

The one thing that you can almost always rely on research leading to, is more research.

Offline texas arty

  • Trade Count: (0)
  • Member
  • *
  • Posts: 8
Re: The Making of a Full Scale Limber Chest
« Reply #28 on: October 11, 2012, 07:00:36 AM »
I am interested in how you make the hasp and locking pin. Hope you can post some pictures.

texas arty,
I will be posting pictures when I get there.
Are you making a limber chest? 
Zulu

Very nice work Zulu
Yes I am in the process of making ammo boxes for a Gatlin gun carriage. I am just scaling down the limber chest for a Prairie box. So I am using the same hardware as you are just smaller. I like the way you have made the hinges also. I may have to borrow that one from you.

Offline Zulu

  • Trade Count: (0)
  • Senior Member
  • *****
  • Posts: 2477
  • Honor is a gift a man gives himself.
    • Wood & Ironworks
Re: The Making of a Full Scale Limber Chest
« Reply #29 on: October 11, 2012, 08:54:32 AM »
A friend has told me that I am giving my secrets away by posting  this build.   I don't see it that way.  Yes, I'm showing everyone how I do some things.  I hope I am helping someone.  I think that if someone has the tools and skills to build a limber chest, they won't be buying one from me anyway.  Many folks lack the time, tools, or even the desire to take on a project like this.  That is the person that will buy this chest. 
I think that seeing how it is made from scratch is a good selling point.
 
Cannoneer,
A 1/4 scale limber chest will have the same number of parts as a full scale one.  Each part will need the same attention as the big one.  Yes, there is a little savings in material but I think it is minimal.
Just because something is 1/4 scale does not mean that it carries a 1/4 price.  It just doesn't work that way.
I don't think it would be more difficult.  Maybe a little easier.  It's easier to drill a hundred holes in 1/4" steel than 3/8" steel.  It's easier to heat and bend 1/2" round bar than 3/4" round bar. But I don't think there would be a lot of time saved. 
I would like to build a smaller chest.  It would be fun. 
 
Here are a few more pictures.
 
I got the hinges cut to size and the bottom tabs welded on.  I also inset the tabs in the bottom of the box.  All insetting is finished in eight places on the bottom.


Testing and adjusting the hinges.  It takes a lot of fine tuning to get everything right.


In this picture you are looking at the lid upside down.  Notice the "rain edge"  It is the 1/4" strip that runs around the perimeter of the lid that helps seal it when it is closed.  When the time comes it will be covered with the copper top.

 
I'm making progress but there is still a lot to do.  Plus I'm going fishing tomorrow so there won't be any pictures till I do more work. ;D
Zulu


Zulu's website
www.jmelledge.com